
Image Maps and Hot Spots
Defining the Image To Be Used (Mapped to) and Specifying the Hot Spots For It
Warning! Get out your math textbooks: image maps use x,y coordinates to specify locations on an image.
- D05b - (7:08)
- To make an image map, start off by putting the image on the page using the standard img tag with the src, width, and height attributes.
- Use the border attribute and set it to 0 so that we do not see an ugly blue edge around the image:
- border=0
- Then add another attribute that will allow it
to have an image map associated with it: the usemap attribute.
- The usemap attribute is needed because the method for defining the size, shape, and location of the hot spots is not part of the img tag.
- Example of the usemap attribute (don't forget the # symbol!):
<img src=anyimage.jpg width=480 height=640 usemap=#dansdemo >
- Rectangular hot spots are defined thusly:
- This example is for a single rectangular hot spot.
- Use both the name and the id attributes with the same value (the same as is done with named anchors):
<map  name=dansdemo  id=dansdemo>

                 <area shape=rect coords=63,35,156,255  href=anypage.html target=_blank>

</map> - The map tag's name and id attributes provide the name that the img tag refers to in its usemap attribute: dansdemo.
- The shape attribute indicates that the shape will be rectangular.
- There are four coordinate numbers. For those of you who are familiar with x,y coordinates in math, these numbers the same, except that the y values go up going down on the image. The top left corner of the image is x=0, y=0.
- For those of you unfamiliar with this concept, it means that each pair of numbers represent the horizontal and vertical distances in pixels of the rectangle's upper left and lower right corners.
- The rectangular hot spot's upper left corner is 63 pixels to the left of the image's left edge and 35 pixels from the top of the image.
- The lower right corner is 156 pixels from, the left edge and 255 pixels from the top edge of the image.
- Note how similar the area tag is to the anchor <a> tag: both use the href and target attributes. The target attribute is not required for the area tag, but for the following exercises I would like you to include it..
- D05c - (4:03)
- The area tags define the shapes and their position relative to the image that they are mapping.
- Each area tag needs the shape attribute, there are three options:
- rect (rectangle)
- circle
- poly (polygon)
- Each shape needs to be provided with location information in x,y coordinates.
- Location coordinates explained in more detail:
- All values are in pixels and are relative to the upper left hand corner of the image.
- Almost all web page position references are relative to the upper left of whatever is being referred to, be it an image, the browser window, css absolute positioning, and other situations as well.
- x = horizontal location
- x values start at 0 for the left edge of the image and go up as you go from left to right.
- y = vertical location
- y values start at 0 for the top of the image and go up as you go down the image (the opposite of what I learned in math - but then there are several different coordinate systems).
- rect - Rectangles only need the upper left and lower right x,y coordinates to define the rectangular shape.
- Numbers are given in x,y coordinate pairs: x1,y1,x2,y2 where x1,y1 = upper left corner of rectangle, x2,y2 = lower right corner.
- circle - Circles need three values:
- x position of center of circle.
- y position of center of circle.
- radius of circle (the distance from the center of the circle to its outer edge.
- ovals are not allowed.
- poly - Polygons
- Each point on the shape is specified in x,y values given in a clockwise direction. For example, a 8 sided polygon (an octagon) would need 8 pairs of x,y coordinates .
- All values are in pixels and are relative to the upper left hand corner of the image.
- Additional shapes gets added to an image map by using an additional area tag.
- One of the problems with hand coding image maps is that you cannot see where the shapes are as they get created, so measurements need to be done in a program like Fireworks or Photoshop in order to know positions and sizes.
Exercises
- Note: you may know of easier ways to create image hot spots using software, but do not use them, you would be missing the point of this exercise and denying yourself an understanding or web positioning in general, which this exercise is intended to introduce you to and which is important in CSS.
- D05 - (10:28)
- Create a new html file and name it YourLastName_D05.html
- Give it an html title of Ship Rect On A Reef or something else as incredibly brilliant.
- We will create one hot spot together, then you do the rest.
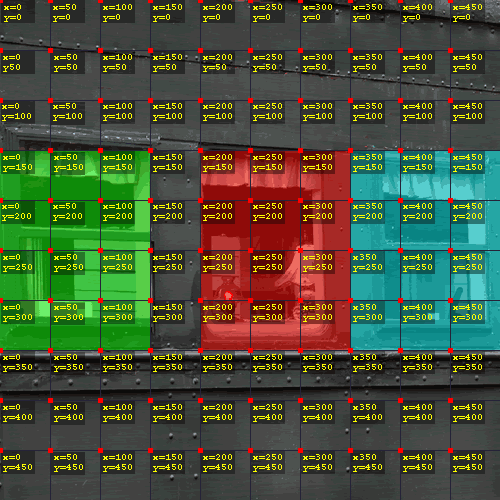
- Right click on this image to download it, or click here, then create an image map for each window each with a link going to a geographic web site of any kind, include the target=_blank attribute and value.
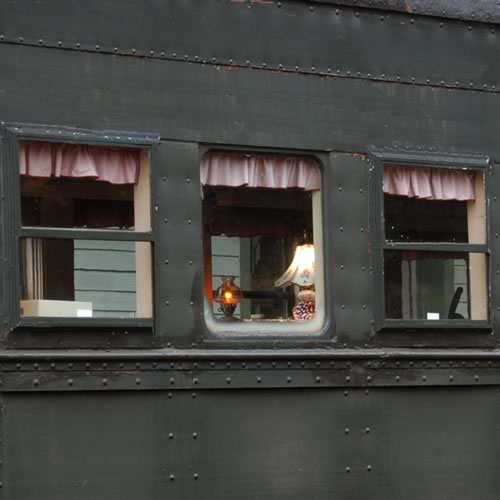
- Make your hot spots correspond with the color overlays.
- D06 - (11:40)
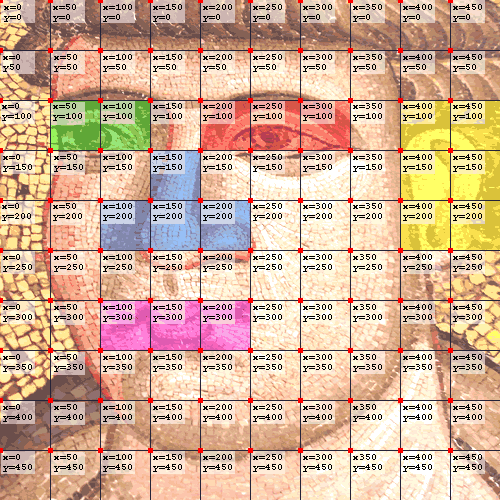
- Create a new html file and name it YourLastName_D06.html
- Give it an html title of Do you see hot spots before your eyes? or something of equivalent insightful pithiness.
- Right click on this image to download it, or click here.
- Then create an image map for each colored area in the second image below.
- Assign each hot spot a link going to a web site that is in some way relevant to that part of the image.
- Include target=_blank so that the page being linked to will open in a new browser window.

- Make your hot spots correspond with the color overlays. below. This includes the nose which needs to be a polygon (poly). The rectangles ought to have only two pair of coordinates, the nose ought to use a poly shape with 8 pairs of coordinates.
- D07 - (2:22)
- Create a new html file and name it YourLastName_D07.html
- Give it an html title of What sign were your born under?
- Right click on this image to download it, or click here.
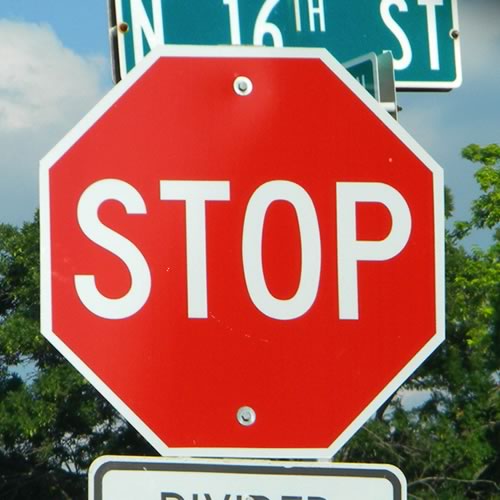
- Make your hot spots correspond with the yellow outline surrounding the gray overlay.

- Create one polygon hot spot that uses 8 pairs of coordinates listed clockwise starting at any point. Use this illustration to guide you:
Conclusion:
There are easier ways to create hot spots, but this is an html course and the objective is to get your hands dirty with code. More importantly, understanding coordinate locations is quite important for a variety of reasons on the web, to mention a few:
- To position a pop-up sub-menu relative to the menu it is coming from.
- To use JavaScript to open a new browser window in a particular location relative to the browser window over which it opens.
- To use css absolute positioning.