User Guide for Photoshop's Spot Healing Brush Tool
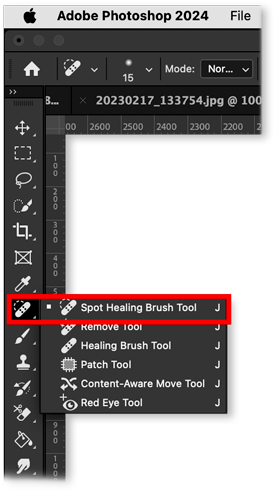 |
The Spot Healing Brush Tool is used for removing small imperfections from a photo. It's perfect for removing most skin blemishes and other undesirable small parts of an image. The Spot Healing Brush Tool is part of a group of five similar tools. They are all located together in the eighth (8th) tool position down in the Photoshop Toolbar, as shown in the illustration. If you do not see the icon for Spot Heeling Brush Tool, hold down on the button in the toolbar at the eighth (8th) position down. The tool will then appear as one of five tools in a pop-out menu, as shown. Notice! When you paint with the Spot Healing Brush Tool the stroke will appear as a very dark gray. This is temporary and will not persist after you end the stroke. Also, the results of the paint stroke are often unsatisfactory. You will then need to use Undo (Windows: Ctrl-Z / Mac: ⌘-Z) and try again perhaps using different option settings as described below. This is often a trial-and-error endeavor. |

The Spot Healing Brush Tool (shown selected in the red square in the toolbar at bottom left) has settings available in the Options Bar which is above the image area and shown outlined in red above. From left to right, here are your options:
- The first item on the left side of the Options bar shows The Spot Healing Tool's icon.
- It has a menu that allows you to select any preset you may have created for this tool.
- A Preset saves various tool settings as a single preset file. This allows you to easily reapply those settings without needing to set each one again.
- A preset can save a lot of time if you are doing repetitive work.
- Using the menu box, you can also create new presets and manage presets for this or any other tool using the Preset Manager ( Edit > Presets > Preset Manager ).
- Brush Settings
- Like many of the other Photoshop tools, the vehicle of application is likened to a brush which is represented as a circle for simple brushes.
- Select a brush size that is slightly larger than your target.
- Brush sizes can also be set holding down on the [ or ] bracket keys for, respectively, a smaller or larger brush size.
- You may also adjust the brush edge to be either soft or hard.
- Softness/hardness can also be set by holding down the key combos of Shift+[ for a softer edge or Shift+] for harder.
- Mode allows you to set a blending mode.
- This is a somewhat advanced feature used for employing simple mathematical algorithms to blend the application of the tool with the image.
- This option also exists in the Layers panel and affects how an upper layer will be blended with the layers beneath it.
- Type
- This option usually requires some trial-and-error testing. The following bullet points contain Adobe's description of the effect of each. Note that the term selection in this context seems to refer to the brush stroke you apply: (The following three bullet points are ©Adobe.)
- Content-Aware: Compares nearby image content to seamlessly fill the selection, realistically maintaining key details such as shadows and object edges.
- Create Texture: Uses pixels in the selection to create a texture. If the texture doesn't work, try dragging through the area again.
- Proximity Match: Uses pixels around the edge of the selection to find an area to use as a patch.
- Content-Aware: Compares nearby image content to seamlessly fill the selection, realistically maintaining key details such as shadows and object edges.
- Sample All Layers check box.
- In general, this is a good option to enable.
- This option will allow you to put an empty layer above the layer you want to retouch. Then, by "painting" on the upper layer you will not affect the image beneath it. However, you will see the effect of the retouching on the image and these will become a part of the image when the Photoshop file is exported to jpg, png, webp, etc.
- Having this upper layer also makes it easy to modify the retouching work you have done without affecting the lower layer containing the image.
- Brush angle - this setting is also available in the Brush Settings section of this toolbar. This allows you to set the angle of the brush tip. It will not affect round brushes.
- Finally, at the right end of the Options bar, is a button with an icon of concentric rings emanating from a stylus tip.
- This is used for setting a stylus for your work.
- A stylus is used with electronic drawing tablets such as a Wacom tablet.
- When you hover over it the tooltip reads as follows:
- Always use Pressure for Size. When off, Brush Preset controls pressure.
Usage Tips
Do not paint directly on the image layer. It is better to create a layer above the background image to do your spot-heeling work on. That way the original layer will be intact for any future purposes.
- Select the image layer.
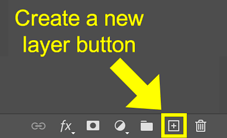
- Click on the Create a new layer button at the bottom of the Layers panel:
Or, you can use your keyboard. Press Ctrl/⌘ - Shift - N
- The new layer will be put above the image layer in the Layers panel.
- The new layer will be selected.
- Name the layer Retouching.
- In the Spot healing Brush Tool Options bar, enable (check) Sample All Layers.
- This means that when you do retouching work on this layer the layer beneath it will provide the image information that you need in order to do the retouching on the new empty layer that you just created.
- Doing this allows you to modify or erase any part of your touch-up work.
- Set the brush size and softness to your liking.
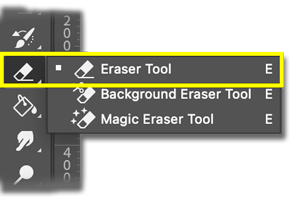
- The eraser tool is in the toolbar. E is its shortcut key.
For further information:
- Watch this video for an overview of how the spot healing brush tool works.
- Read this info about the tool.
© 2024 Dan Vaughan — Most recent proofing: 2024-02-05