FTP Setup in Filezilla and Dreamweaver
What is FTP?
FTP = file transfer protocol. FTP is similar to HTTP (hypertext transfer protocol). They are both transfer protocols used to send files between computers. In the case of FTP, it is designed for the transfer of files and little else.
HTTP, on the other hand, is more complex. "HTTP is the foundation of data communication for the World Wide Web" per Wikipedia. When you click on a link in a browser, a request for the page that the link specifies is sent as an HTTP request to a web server. The request includes an "HTTP Header" that provides information about the browser type, version, and much more. Then a page is returned from the server to the browser with an HTTP response.
Files Are Not Moved - They Are Copied
When using FTP to send ("put") a file or folder to a server, or to "get" a file or folder from a server, the file is almost always copied to the other location and not moved (transferred) there. Copies are also made when you drag, or copy, a file or folder from one drive to another on the same computer.
Note that this is different from what happens within one drive. If you drag a file from one folder to another folder on the same drive it is moved to that other folder location and a copy is not made.
Saving a Connection Setup for Future Use
Typically, it can take some time to set up a connection to a remote server. But those connection settings can be saved within the FTP client (program). These settings can include:
- login or username
- password
- the location of the default local computer folder that contains the files needed by the remote site
- the location of the default remote (server) folder where the files are to be sent (and from where they are later seen by visitors using Web browsers).
Once you set up the connection it can be saved as a “Site” in both Filezilla and Dreamweaver. When done, it becomes a very simple matter to reconnect to the remote server in the future. You only have to select the site name in your FTP client and the connection is established for immediate use. You will not need to fill out all the information again. It allows you to easily move from one web project to another.
Establish a Connection to a Remote Server and Save It as a Local Site
The following instructions are for setting up an FTP connection to a remote server in order to send files to it. These instructions also include creating a saved record of the settings that are needed to establish the connection. It will allow you to easily re-connect in the future. When you complete the settings in either program (also called a client due to their place the the client-server model), you will have a way to quickly make connections to the remote site.
This page does not cover all aspects of establishing FTP connections and saving them. Please consult the following information for more details:
- For details about how to use Filezilla, please consult these links:
- For details about using Dreamweaver's built-in FTP and file management capabilities:
Saving Filezilla's remote server settings
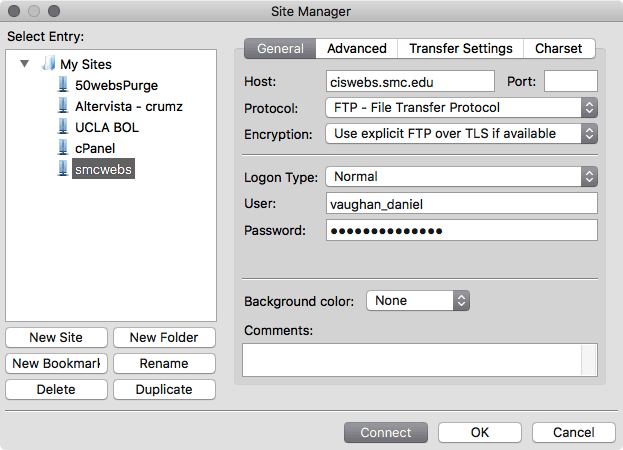
To create and save FTP connection settings, use the Site Manager:
- File > Site Manager
- The Site Manager dialog box opens (illustrated below).
- Then click on the New Site button, lower left.
- A new icon appears in the Select Entry column with highlighted text New Site.
- The text is highlighted indicating that the name can be changed.
- Enter a name you would want to see in that column in the future in order to select that particular site.
- The name can be anything you like and spaces are allowed. But use a term that you will be able to recognize the meaning of in the future. For example, don't name the site "site 2". Instead, use something more descriptive such as "Tonys Pizza".
- Then fill in the information about the Host (which means the FTP) address.
- Getting the proper FTP address can elusive. Ask the server manager or contact the web hosting service.
- User and Password:
- You probably know what the User name (or, login) is and the Password. If you do not know, consult with the web hosting service or the server manager.
- For the remaining settings consult with the manager of the site/server to find out what to use.
- Many web hosting sites have web pages containing the information.
- Sometimes it becomes necessary to use trial and error if the information is not readily forthcoming.
- Click the Connect button to test the connection. Hopefully, it works. Otherwise, try re-entering the password and then experimenting with alternate settings.
- The settings in the illustration below worked for me to connect to the Santa Monica College computer department's ciswebs server.
Saving Dreamweaver's remote server settings
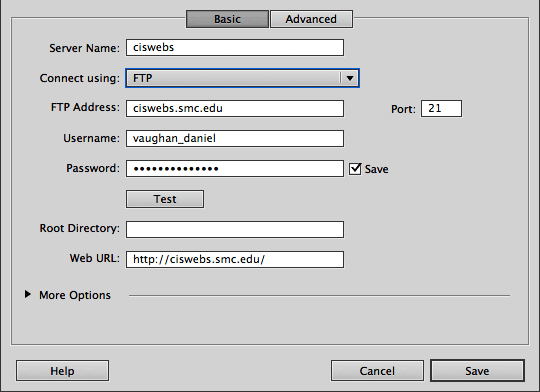
- Site > New Site >
- The Site Setup for Unnamed Site opens.
- Provide a site name.
- Enter the name you want to see in that column in the future in order to select that particular site.
- The name can be anything you like and spaces are allowed. But use a term that you will be able to recognize the meaning of in the future. For example, don't name the site "site 2". Instead, use something more descriptive such as "Tonys Pizza".
- Select the folder on your computer that contains the files for the site including the files that you will want to upload to the server. If you don't have a folder yet, create one.
- Select Servers in the left column.
- Click on the “ + “ sign to start specification of the settings needed for the server connection.
- Then fill in the information needed.
- Getting the precise FTP address can be elusive.
- User and Password:
- You probably know what the User name (or, login) is and the Password. If you do not know, consult with the web hosting service or the server manager.
- For the remaining settings consult with the manager of the site/server to find out what to use.
- Many web hosting sites have web pages containing the information.
- Sometimes it becomes necessary to use trial and error if the information is not readily forthcoming.
- Once completed, click the Test button to make sure that the connection works. If it does not, chances are that the password was entered incorrectly. Otherwise it could be a number of things, such as the incorrect FTP address or look in the More Options section and test some of those settings.
- Note that the Save checkbox is enabled by default, therefore, if you don’t want others to make the connection without authorization, uncheck it.
- The root directory will default to the root for the site on the server. You can set the root directory to a sub-directory as needed.
- The following settings worked for me to connect to the Santa Monica College computer department's ciswebs server.
Copyright © 2016 Dan Vaughan - full review Nov. 5, 2016