How to display file extensions in Mac and Windows
How to list files in Details view in Windows
Instructions For both Windows 7, 10, and Mac
Table of Contents
- What are file extensions?
- Setting a Mac to display file extensions
- Setting Windows to display file extensions
- Setting Windows to display files and folders in the robust Details view
- The benefits of Details view: A comparison between large icons view and Details view
What are file extensions?
- File extensions are the end part of file names, the part that comes after a dot and is usually 3 or 4 characters in length.
- Examples of web file extensions:
- Web pages: .html .htm .php .jsp
- Example: index.html
- Web image file types: .png .jpg .svg .gif
- Example: logo.png
- CSS and JavaScript files: .css .js
- Example: global-styles.css
- Other file extension:
- MS Word: .docx
- Example: report.docx
- Excel: .xlsx
- Example: budget2019.xlsx
- MS Word: .docx
- Web pages: .html .htm .php .jsp
- By default, file extensions are usually not visible in Windows and, sometimes, Macs.
- You can change settings to make extensions visible.
- The benefit of seeing file extensions:
- If you are able to see the extension of a file you will probably be able to determine what the file is used for (especially if the file name is meaningful) and which programs(s) can open it.
- Why bother?
- It is beneficial to be able to see file extensions because when you see one it enables you to rapidly identify the file-type without needing to open the file.
- Combining the name of a file with its file extension may be all that you need to know precisely what the purpose of the file is.
- NOTE: changing a file extension will not change the file into another file type nor have the characteristics of that other file type.
- For example, changing an Excel document extension from .xlsx to .jpg will not allow it to be displayed in a web browser. The .xlsx file type cannot be displayed by a web browser regardless of its file extension.
Further information: Lists of file extensions
There are hundreds, probably thousands, of file extensions. The following sites provide more information about them.
Setting a Mac to display file extensions
If file extensions do not appear n the Finder you will now set your Mac to make file extensions visible. Please do the following:
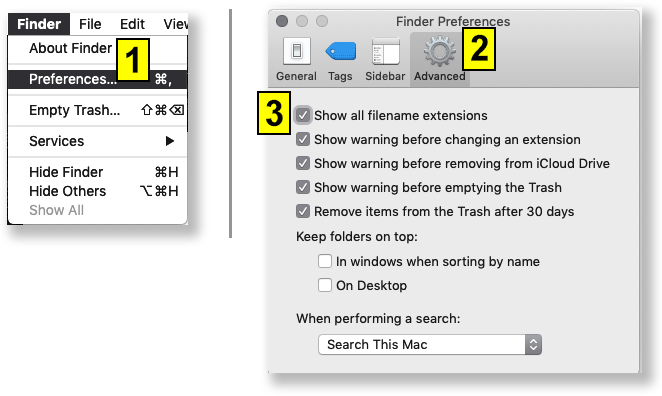
- First, open the Finder's Preferences.
- If you don't know how to select the Finder, hold down the Apple (Command) key ( ⌘ ) on your keyboard and, as you hold it down, tap on the Tab key again and again until you select the blue smiley Finder icon:
 - then stop tapping the Tab key and remove your finger from the ⌘ key.
 - Now you are set to the Finder. To be certain of this, the word Finder ought to be visible to the immediate right of the icon in the upper left of the Mac screen. If not, try the procedure in the bullet point item directly above.
- If you don't know how to select the Finder, hold down the Apple (Command) key ( ⌘ ) on your keyboard and, as you hold it down, tap on the Tab key again and again until you select the blue smiley Finder icon:
- Next, from the Finder menu, select Preferences... see item 1 in the illustration below.
- The Finder menu is to the immediate right of the Apple menu - see illustration below.
- In the Finder Preferences dialog box ( 2 ).
- Enable Show all filename extensions ( 3 ).
Setting Windows to display file extensions
Windows 10 - my instructions
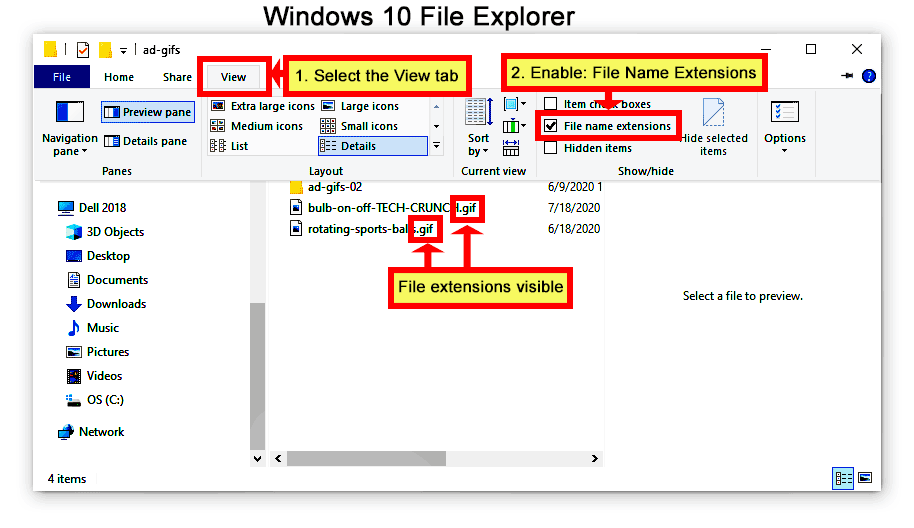
Open the Windows 10 File Explorer
- Click on the View tab.
- Enable File name extensions
File extensions for individual files ought to be visible now. Note that folders do not have file extensions.
Setting Windows to display files and folders in "details" view
You can set Windows to provide many types of information about files and folders ("details"):
- Open Windows Explorer (or, File Explorer on Windows 10).
- Right click on the folder whose you are interested in using or learning about.
- Select Properties
- Click on Customize tab.
- Beneath Optimize this folder for: select Documents
- Enable (check) the checkbox Also apply this template to all sub-folders
- Click Apply
- Click OK
- If it is not already opened, please open Windows Explorer or File Explorer (this depends on the version of Windows).
- Right click on the Start button in the lower left corner.
- Select Explore or Open Windows Explorer or File Explorer, again, the choice depends on the version of Windows that you are using.
- To set your files to be viewed in Details view:
- For File Explorer (Windows 10):
- Click on the View menu to open the ribbon for it.
- In the Layout section select Details
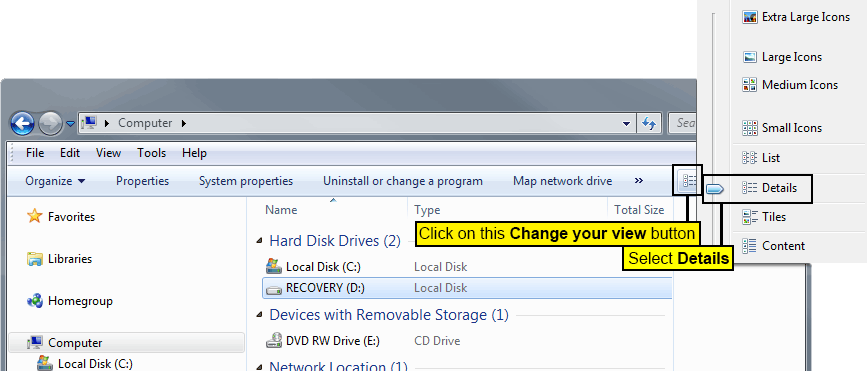
- For Windows Explorer (Windows 7):
- On the upper right side of the menu bar there is a button that lets you set the type of view of the folders and files.
- To check what the button does, hover over the button, and a tool tip will appear: Change your view
- Click on the button.
- The choices are either icons, names, or various combinations of the two (see next illustration).
- Select Details. I always recommend using Details view because it provides the most information.
- For File Explorer (Windows 10):
Sub-folders and files ought to display in Details view automatically within your student folder. If the view is other than Details view:
- Follow steps 4-5 in the Setting Windows to display file extensions section above.
- In the top part of the dialog, in the Folder views section, select Apply to Folders, then OK it.
Comparison of Large Icons and Details views
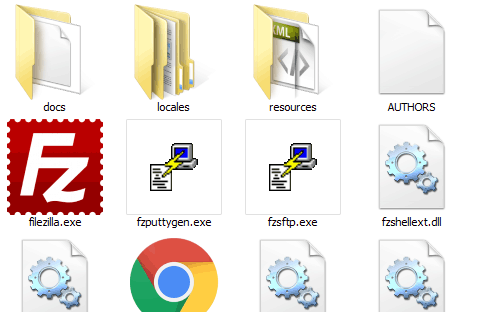
Icons view
- Provides almost no information other than file and folder names.
- The icons themselves can be deceptive. In the image below, the Google Chrome icon (partially shown) is used to represent an HTML file. The icon is being shown because I manually set HTML files to be opened in Chrome when the file is double-clicked. However, the Chrome icon suggests that it is only for use in Chrome or that it is some type of Google file.
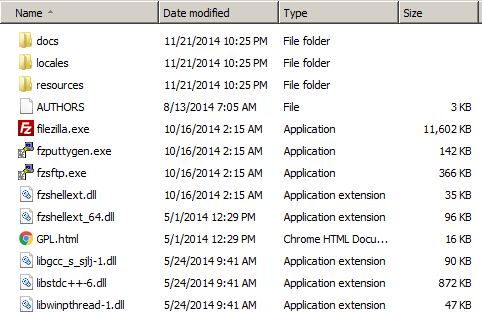
Details view
- Details view provides a view similar to a spreadsheet or database list.
- You can sort by any of the data fields (columns) by clicking on the column header. Click a second time to reverse the sort.
- By default, you are provided with the data fields (columns) containing the name, type of object, and, for files, the file size.
- You can add other columns/fields by right-clicking on any of the column headers and selecting from the menu of options (see image below).
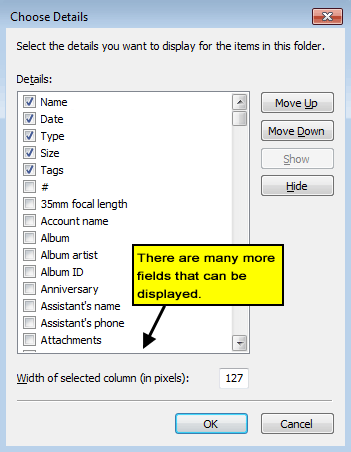
- But note that the database fields that can be associated with a file varies depending on the file type that it is.
- For example, music files and Microsoft Word files have many fields that are editable.
- One field that is available for images is dimensions, and I recommend that you display that column if you work with images.
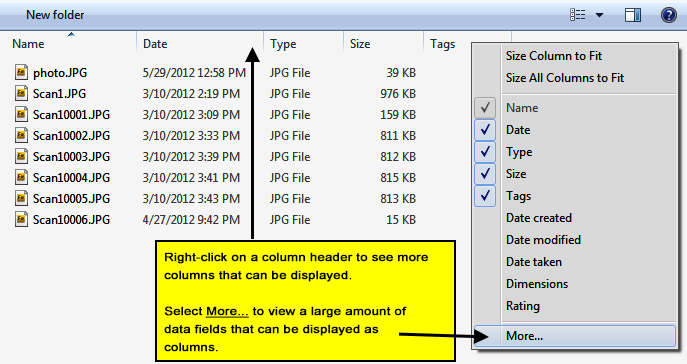
- Click on the More... menu option (above, right) and you will be shown an astounding array of fields that you can display in the List view. But, again, note that the data fields that can be saved with a file varies with file type.
- Note that if you right-click on a file and select Properties you will see the data and field names associated with that type of file. If the data values are editable, you can click on the value and enter or edit the value.