Software preferences allow a user to save optional settings for how an application is used. The preference settings that are made will remain for future work with the software. The preferences that are available will vary from program to program. Sometimes there are many, other times only a few. The more preference settings that are available, the more the user will be able to customize and improve their user experience. Dreamweaver has many preferences.
The following instructions are for setting some preferences in Dreamweaver CC. These preference options are the same for Macs and Windows.
Some recommended preference settings
To open Preferences:
- Windows: Edit > Preferences
- Mac: Dreamweaver menu > Preferences
Category: Code Format
- Open Preferences > Category > Code Format > Tag Libraries
- The options here include
- Specify the HTML attributes that automatically appear in a selection list when coding within an opening tag.
- You can remove or add tags and attributes to this list.
- This can be used for other languages as well - see the bottom of the list of HTML attributes for tags used by PHP, ASP, ADSP.NET, and others.
Category: Code Hints
- Close Tags: After typing </
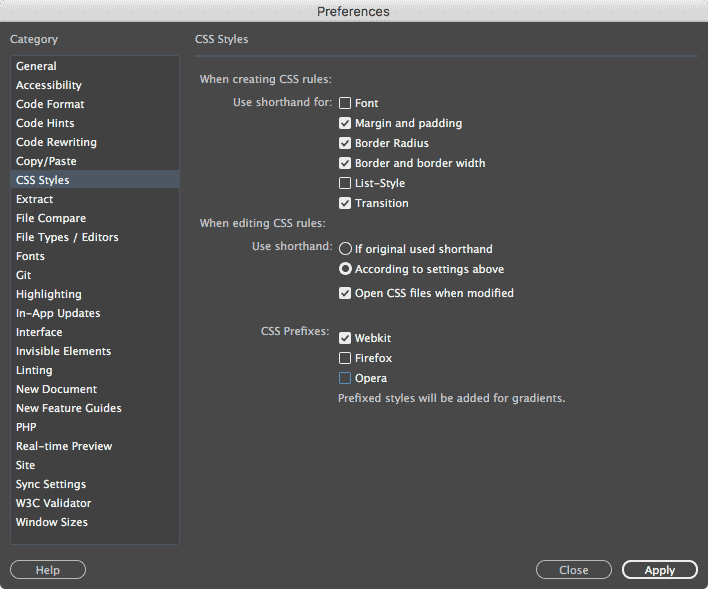
Category: CSS Styles
- Enable the Use shorthand for: properties as shown in the illustration below.
- Using shorthand will create less code.
- But you may not want to use shorthand until you have enough experience with CSS code because shorthand CSS code is more difficult to read and comprehend than fully specified CSS.
- Vendor-specific CSS prefixes are sometimes required due to uneven support of newer CSS properties by a few browsers.
- They add a lot of code but are sometimes required.
- They are not needed as much as they once were.
- As of this writing you ought to enable only Webkit.
- Make the settings shown in the illustration below:
Category: File Compare
- Please see these instructions for configuring and using File Compare
Category: Interface
Setting code color preferences
To control the colors of your code, I recommend that you create a collection of your own colors in its own .less file, as follows.
- Open Preferences > Category > Interface > Code Theme
- First, save one of the default Code Themes as a new theme as follows:
- Determine which one of the existing code themes is the most similar to what you want. You will use that theme as the basis for your own theme as follows.
- Click the plus ( + ) sign.
- The New Code Theme dialog box will open.
- It will have these options:
- Theme based on - Select the theme that is similar to what you want.
- Theme name - Provide a name such as my-colors.
- Click Create
- Click the little pencil to edit the .less file that has been created for your theme and will be used by Dreamweaver to control code colors when that theme is selected.
- Note that .less is a CSS preprocessor file type.
- Use the Token Inspector to ascertain which .less classes affect selected code.
- Open this link for more information.
- Open the Token Inspector using Google Chrome.
- Paste into the Token Inspector the code from any typical HTML file.
- Click on anything in the code that you want to format.
- The class in the .less file that is affecting the appearance of that code will be highlighted in the right column.
- You can then edit the properties of that class in the .less file.
- The most commonly used classes will be near the top of the code.
- They are preceded by the comment code:
/* Color Theme Selectors & Color Values */ - As of this writing they are on line 164 of my .less file.
- You can change the positions of the classes, or nest/un-nest them in groups, keeping in mind the principles of CSS style coding.
- Whenever you save the .less file, the formatting of the code in Dreamweaver will change immediately.
- By repeating the steps of edit, save, and observe the formatting results of your edits, you can gradually arrive at a color theme that you like.
- Note that near the top are the @foreground and @background colors. These are the default colors for the background color of your page of code (I like black) and the foreground color - which will affect text color unless overridden by subsequent code in the .less file.
Category: Real-time Preview
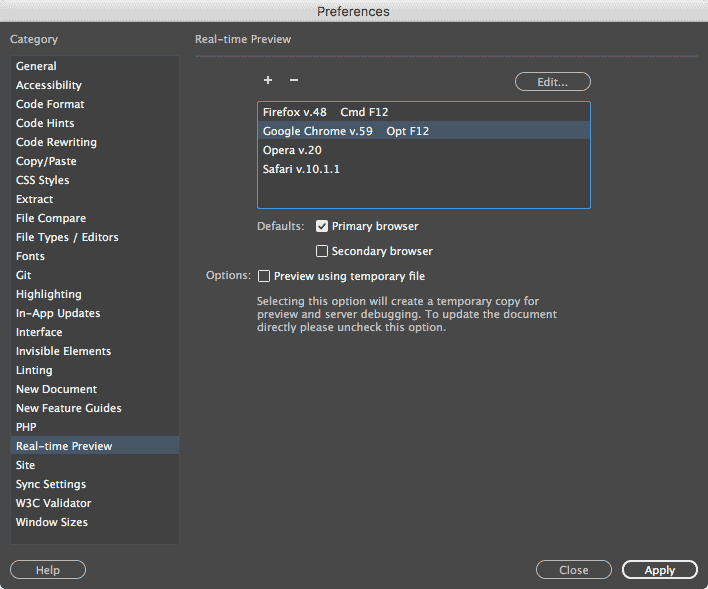
Dreamweaver makes is easy for you to see your pages in actual browsers. Not only that, but any changes you make will update in the browser or device you are viewing them in. For desktop browsers you will first want to select the browsers that you want to view the previews in.
You can select the browser that you want to see your page in. You can also add additional browsers to the list of browsers available for previewing by clicking on the + button above the browser list (see illustration below).
- It is a good idea to include the version number of the browser when you enter its name when adding a browser to the list.
- In order to get the version number:
- When the browser is open, its version numbers can be obtained by using the menu option About <browser name> which is found:
- Windows:
- In Chrome and Firefox you will find that option in the hamburger menu and selecting Help or clicking the ? symbol respectively.
- If the browser has a menu bar, you will find it in Window > About <browser name>
- Mac:
- Use the Chrome, Firefox, or other browser's name menu.
- Windows:
- You can also get the version number by finding the program file (for example, chrome.exe) and right-clicking on it then:
- Windows > select Properties
- Mac > Get info
- When the browser is open, its version numbers can be obtained by using the menu option About <browser name> which is found:
- Use the checkboxes to designate a primary and secondary browser.
- This enables you to use the keyboard shortcuts shown.
- Note that there may be conflicts with other uses of those shortcut keys particularly on Macs.
- There are only two keyboard shortcut options available.
Here is an example of the browser settings:
Options Section: Preview using temporary file
- When this is disabled you will be asked to save all the files associated with your web page prior to the preview if those files have unsaved changes.
- If you would prefer to not save your files each time you preview a page, you can enable the checkbox.
- When this setting enabled (checked) you will not need to save your HTML file prior to previewing it locally in a browser.
- A temporary HTML file will be created each time you use Dreamweaver to preview a page in a browser.
- This temporary file will include the code in its current state regardless of whether the file(s) has been saved or not.
- Any code required from associated files (css, js) will embedded inside the html file.
- An automatically generated filename will be created for the temporary preview file.
- The file name will begin with the letters TMP.
- You will see that file name in the address bar of the browser when you preview the page.
- Example: TMP1URVK9.htm
- The TMP files use the file extension .htm regardless of the file extension that the original file is using.
- Note that you may find TMP files in your folders.
They can be deleted without harm.
- Normally they are automatically deleted when you quit Dreamweaver, but if Dreamweaver has crashed they might remain.
- You will see that file name in the address bar of the browser when you preview the page.
- Every TMP file will have a unique name.
- The purpose of generating a new file name each time is to prevent the browser from loading the page in its prior state from the browser's cache.
- Info about browser cache:
- When browsers load a web page, the files used by the page are often saved in a folder on the user's computer when they are initially downloaded.
- This allows for rapid reloading of the page's files when it is requested again. This reduces the amount of time it would otherwise take to download the files a second time. Instead of downloading the files again they can be loaded from the cache. But the most up to date file will not be displayed if the page has been changed subsequent to the initial viewing of it.
- Info about browser cache:
- The purpose of generating a new file name each time is to prevent the browser from loading the page in its prior state from the browser's cache.
- The file name will begin with the letters TMP.
- When this option is not enabled (unchecked - which is the default) it will require you to save the HTML and related files if they have changes that have not been saved before you can preview the page in a browser.
- The actual file will be shown in the browser instead of a TMP file.
- If you have not saved the file you will get an alert informing you that you need to save the file(s) first.
- Dreamweaver does not have an auto-save capability. Therefore, save often!
- Note that you will not lose the capability of "undoing" your edits after you save, so there is little risk when saving your file before previewing unless you quit out of Dreamweaver.
Apply and save your settings
- *** You must click the Apply button to save the settings you have made. ***
- Then click Close.
Further information about Dreamweaver preferences
- This video is quite helpful for information about setting preferences in Dreamweaver.
- Previewing pages in Dreamweaver