Defining a Site in Dreamweaver
Including a connection to a 50webs web server
Introduction
- You will be building your web pages locally on your computer.
- Defining a site in Dreamweaver allows Dreamweaver to maintain the coded connections between your site's pages, such as links between other files or images.
- This is relevant to links that use what are referred to as document (or file) relative paths, which are commonly used to reduce code file sizes and to speed-up online connections.
- Then, if files with links to other site files are moved within the site (by using Dreamweaver, which is what you ought to do), those links will be automatically updated so that your viewers are not subjected to link rot!
- In order to make your pages available on the web you will need to upload them to a web server, which is basically another computer.
- Defining a site can also establish a direct connection between your local site files and your files at a site on a remote web server thus allowing for for rapid uploading or synchronizing of files between them.
Instructions
- Create a folder on your computer that you will use for this course.
- Name it: web-development-adobe
- No spaces in file or folder names because most servers run on LINUX.
- Defining a site in Dreamweaver.
- You will be building your web pages locally on your computer.
- Defining a site in Dreamweaver allows Dreamweaver to maintain the coded connections between your site's pages, such as links between other files or images.
- This is relevant to links that use what are referred to as document (or file) relative paths, which are commonly used to reduce code file sizes and to speed-up online connections.
- Then, if files with links to other site files are moved within the site (by using Dreamweaver, which is what you ought to do), those links will be automatically updated so that your viewers are not subjected to link rot!
- In order to make your pages available on the web you will need to upload them to a web server, which is basically another computer.
- Defining a site can also establish a direct connection between your local site files and your files at a site on a remote web server thus allowing for for rapid uploading or synchronizing of files between them.
- You will be using a web hosting site provided by 50webs.
- Use of it is only for this course and will not be available after the course ends.
- I have already sent you the username(login) and password for your site.
- Define your site:
- Use the Site menu and select New Site...
- The Site Setup dialog box will open.
- Name your site course site
- Click on the folder icon.
- Select the folder your created previously: web-development-adobe
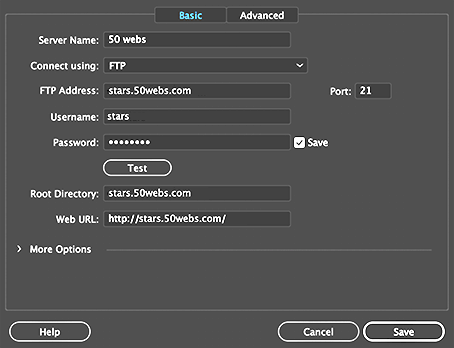
- On the left side of the Site Setup dialog box select Servers.
- Click the plus sign ( + ).
- Make these settings:
- Server name: 50 webs
- Connect using: FTP
- FTP address: - use Your 50 webs login/username followed by .50webs.com
- Example (do NOT use this example) muchado.50webs.com
- User name: the login/username I provided you with
- Password: The password I provided you with
- Root directory: copy your FTP address and paste it into this field.
- Click the Test button. Hopefully you will have a successful connection pop-up message:
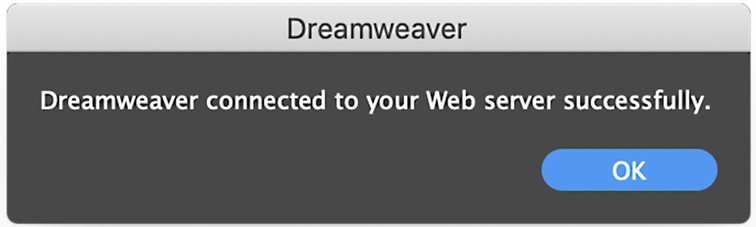
- If not it is almost certainly user error. Reenter the information and test it again.
- Let me know when you have made a successful connection.
- Save the FTP address again.
- Click Save and Save again, and Done
- Example of settings (DO NOT USE THESE!)
- To see the home page ( /index.html *) at your site, enter this into your browser address field:
- login.50webs.com
- Replace login with YOUR login/username.
- Note that naming a file index.html in your site's root level (top level folder) you do not need to provide the file name because servers are set up to provide a default, or index, file when a file is not specified in the address URL.
- Note: Whatever you upload to the remote server is subject to deletion at any time. You do not have any right to it. I reuse it often.
- Save your site setup as a .ste file (a Dreamweaver file extension, but actually an xml text file).
- Look at the .ste file in Notepad as an example of an XML file.
- XML = eXtensible Markup Language.
- XML uses tags used to identify types of information.
- This is very similar to what HTML does however HTML is limited to a restricted set of tags whereas XML does not have that restriction.
- XML is often used to migrate database information, the tags often are the names of the database fields.