How to export simple SVG code for shapes and letters using Adobe Illustrator
- Before starting, make these preference settings in Adobe Illustrator.
- For you to follow along with these How-To instructions you can either:
- Download and use this Adobe Illustrator file (the image is shown in the examples at bottom). Open it in Illustrator.
...or, if you think that you can...
-
Create your own image in Adobe Illustrator with these steps & restrictions:
- Create a new Illustrator file: File > New ...and keep all the default settings when asked.
- Create a few shapes and letters.
- Your text and shapes must consist of solid colors only. Use the Properties panel so specify colors.
- Do not add soft edges to your letters and shapes (other than Illustrator's default anti-aliasing).
- Save your Illustrator file before doing more work. Illustrator used the .ai file extension for its native format.
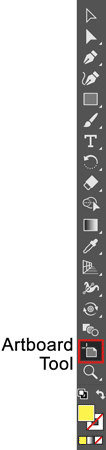
- Use the Artboard tool (see image at right) to crop the image in order to get rid of excess empty background.
- Select the Artboard tool - as shown in the toolbar, at right:
- Simply drag each of the edges of the Artboard tool's perimeter rectangular shape to be close to the edges of (or, on the edges of) your artwork.
- Note that a single Illustrator file can have multiple artboards. They are usually different sizes used to design for different size view screens. Then each artboard can be exported as a discrete file.
- Save your Illustrator file.
- Next, get the code for your SVG image...
- File > Export > Export As... > Format menu > SVG ⇦ this option is probably at the bottom of the Format menu
- ...then pick a location to export the file to.
- You do not need to save the file if you just want to get the SVG code for this exercise.
- However, in professional settings, it is usually advisable to save the file so that you can edit the file in the future without needing to recreate it.
- Click Export
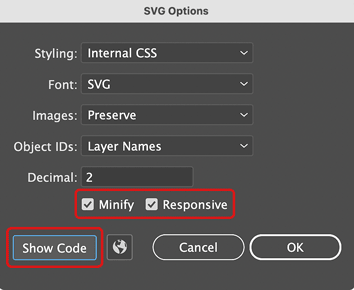
- The SVG Options dialog box opens.
- Use the settings as shown:
- Enable Minify to keep the size of the file small by removing excess spaces and line breaks in the code.
- Enable Responsive to allow the image to scale as its container size varies.
- Click Show Code if you want to simply copy the code (that creates the image) and paste it directly into your HTML code.
Examples
- The div container element that this page's content is in has a width of 70% and padding on all sides of 10px.
- The SVG code that is displayed as the image below is inside a nested div element and has a width of 70%.
- The following sibling nested container div has a width of 50%.