How to select and remove the background
of photos of dahlia flowers
NOTE: The start of this exercise explains the principles and tools used to make selections and use them. The actual assignment is further down.
What is a selection?
Selecting in Photoshop (and most other graphics software) is the process of isolating an area of an image so that it can be:
- Removed to make that area transparent.
- This will reveal whatever is beneath it in either the Layers panel or the a web page.
- In the last case it must be exported in the png-24 format with transparency. That is not part of this assignment.
- This will reveal whatever is beneath it in either the Layers panel or the a web page.
- Given a different appearance.
- The selected pixels of an image in Photoshop can be brightened, blurred, removed, moved, or have any of a myriad of potential modifications made to to them.
Being able to make proper selections is one of the most important skills to have when using Photoshop.
The math behind a selection and how it is applied

I am counting on you to stay awake as you read this!
You probably learned in mathematics that any value multiplied by 0 (zero) results in 0 (zero). Also that any value multiplied by 1 remains the same. And any value multiplied by a decimal fraction, such as 0.5, will result in only part of the original value remaining. For example: 30 x 0.5 = 15
The color image and the selection are essentially two separate matrices of pixels both having the same amount of pixels, rows, and columns. One matrix stores individual red, green, and blue (RGB) values for each pixel (the image). The pixels of the other matrix contain numerical values in the range of 0 (zero) to 1.
These can then be multiplied by each of the corresponding color pixels.
- The result of the multiplication by a decimal fraction is partial opacity of the corresponding color pixel.
- An image does not have to color data every every pixel.
- If there is no color remaining, it is as if the image were floating in front of whatever is behind it.
- If the multiplier value applied to a color pixel is 0 (zero) then the color pixel becomes totally transparent.
- All of its color is removed. There is nothing left.
- If the value is 1, there is no change to the colors.
The multiplier values in a selection also can be represented as a gray scale image. That image is called a mask. Photoshop selections and masks are almost synonymous, they only look different.
The gray scale mask represents a multiplier of 1 as white. Black represents a multiplier value of 0 (zero). Fractional decimal values are represented by grays. For example, a dark gray mask pixel would represent a low pixel multiplier value, such as 0.15
The gray scale image is intended to allow users to visualize the multiplier values, however it can potentially cause confusion. This is because people can easily consider a mask to be an image, but it is not an image, it only looks that way. It is, in fact, a representation of multiplier values from 0 (zero) to 1.
To further confuse the user, the gray scale mask can also be "painted" with a brush using black or white or any gray value in between. So it may seem as if it IS an image like a color photo.
You may wonder, what is the purpose of mask pixels that have a value between than 0 (zero) and 1? The values between 0 (zero) and 1 are decimal fractions that will make a color pixel partially transparent. The most important use of these semi-transparent pixels is to soften the edge of a selection. The edges determine how smoothly the edge of a selection is blended with an image or color behind it.
Capiche?
Are you still awake?
How to select pixels
Tips for viewing your work area
- Before you select any pixels, make your image full size so that you can see the details better. Start with this:
- press Ctrl/⌘ – 0 (zero)
- This will make the image as big as possible without hiding any part of it.
- This will allow you to see the details better.
- As you work, use these keyboard shortcuts to zoom in or out and also move about the image:
- Ctrl/⌘ and the plus ( + ) key and click once or more on the are of interest to you, or use your scroll wheel to zoom in or out.
- Use Ctrl/⌘ and the minus ( – ) key the same way to zoom out.
- This is particularly important:
- Hold down the spacebar as you drag on the image to move around the image
- I recommend you make this setting to enhance the tools uses: Preferences > Tools > enable (check) Overscroll
Methods of selecting
Selecting pixels in an image using Photoshop can be done using many different methods. Some include:
- Selecting areas of the image using rectangular or oval marquee shapes, or drawing the edge for a selection using a "lasso" tool.
- Manually "painting" it in Quick Mask Mode, or on the Layer Mask. This will be covered below.
- Using characteristics of the image such as:
- colors
- contrast
- brightness
- ...and more
You can use a wide array of selection tools and menu options to make your selections. When making a selection you are not limited to using just one type of selection tool. You can use all of the selection tools below to work on the same selection in conjunction with other selection methods. It is often best to use more than one method for making a selection.
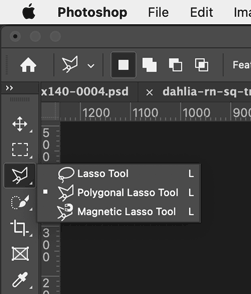
The selection tools from the Toolbar, showing the fly-out menu items
Click and hold on a tool icon to see the fly out menu that shows the other tools associated with it.
 |
 |
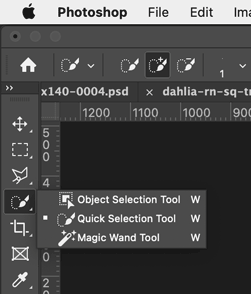 |
| Marquee selection tools | Lasso selection tools | Object, Quick, & Magic Wand selection tools |
Generally, I make selections using the options and tools in this order:
- Select > Subject
- This will work IF Photoshop thinks you HAVE a primary subject.
- If not, press Ctrl/⌘-D to delete an unsatisfactory starting selection.
- Then, use Shift or option/alt keys in conjunction with other tools to add or remove from your selection, as noted in the section below.
- I recommend continuing in this order to build on your selection:
- Quick Selection Tool - to select broad areas of the image if they are similar in color or look.
- Marquee tools can be used to select areas quickly but without refinement.
- Polygonal Lasso Tool - this allows you to "click-click-click" to create the points for a polygonal shape to be added or subtracted.
- The Quick Mask Mode where you can "paint" the selected area.
- Just press the Q key. Read on for the details.
- Don't confuse this with the Quick Selection tool.
Editing your selections
- When using any of the selection tools:
- Use the Shift key to add to a current selection.
- Use the alt/option keys to subtract from a selection.
- You can also quickly swap to Quick Mask Mode and use the X key to switch between the black and white colors to remove or add to the selected (clear) area using the Brush tool.
- Ctrl/⌘-Z to undo your last selection action (quite helpful).
- If your mask has imperfect edges, try this:
- Select > Modify...
- This provides many options, my favorite being Contract by 1 to 2 pixels. Start with 1.
Tips and More about selections and masks
- When you have made a selection you will see "Crawling ants"
- This is the term used to describe the moving black & white outline of a selection:

- This is the term used to describe the moving black & white outline of a selection:
- To be useful, selections are usually converted by the user into a Layer Mask
- To convert a selection into a layer mask:
- If the layer already has a layer mask (a black & white thumbnail to the right of the color thumbnail) you will need to right-click on the black & white layer mask to delete it first.
- Be sure you have the layer selected that you want to add your Layer Mask to.
- Use Ctrl/⌘-D to deselect
- This removes all current selections (but not a Quick Mask or saved selections).
- The layer mask will appear in the Layers panel as a gray scale (in this case mostly black & white) thumbnail to the right of the color image thumbnail.
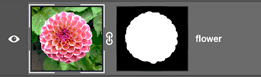
- The black parts of the layer mask will prevent any modifications to the image being applied to the color image in the corresponding black area.
- The white area will limit the application of any effects to just that area; here it is the flower. Effects include color adjustments using adjustment layers or other image changes using layer effects, as well as some other modifications.
- To convert a selection into a layer mask:
- Use Ctrl/⌘-D to deselect
- This removes all current selections (but not a Quick Mask or saved selections).
- It is easy to invert a selection: Select > Inverse
- To convert a layer mask back into a selection:
- Right-click on the layer mask thumbnail in the Layers panel and select Add mask to selection.
- The layer mask will not be removed.
- The layer mask will not be removed.
- Right-click on the layer mask thumbnail in the Layers panel and select Add mask to selection.
My comments about the selection options and other tips
- I am not impressed with the Magnetic Lasso Tool.
- The Quick Selection tool is usually much more useful than the Magic Wand.
- The Lasso tool is very awkward to use with a mouse. You really need to use a Wacom Tablet and its stylus for more control. Usually you are better served by the Polygonal Lasso tool.
- I never liked the term Lasso in this context, it is not the best analog for what it can do.
- Using Quick Mask Mode is not always a quick way to work on a selection.
- I find my brush often lags behind as I paint.
- However, it is very useful just for previewing the effectiveness of a selection - more than the crawling ants.
- The Select menu has additional options to choose from.
Saving your selections
Selections can, at times, require a lot of time to complete. Therefore, it is a good idea to save your selection periodically as you build on it in the event of a crash or if you need to return to a prior saved version of it.
- To save a selection: Select > Save Selection...
- A Save Selection dialog box will open. Give your selection a brief, descriptive name:
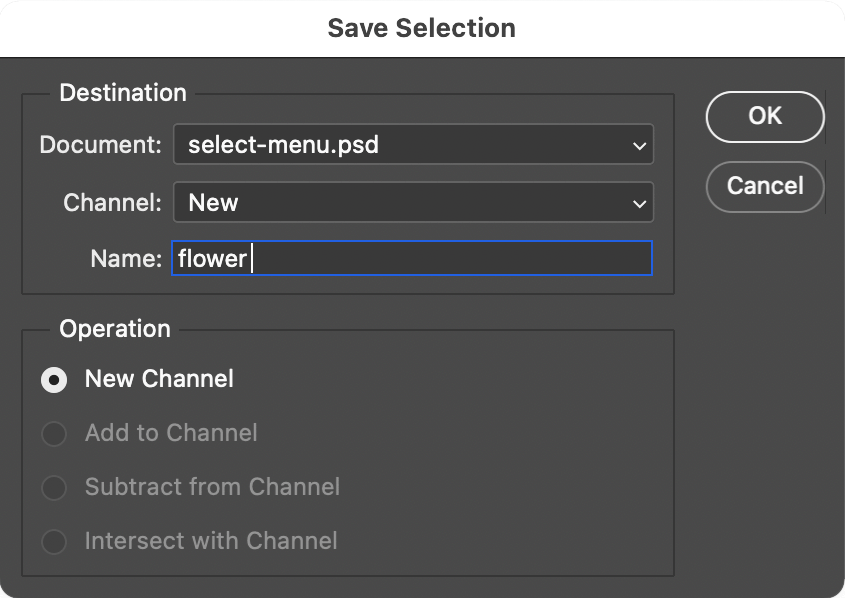
- The selection will be saved as a channel in the Channels panel where it is represented by a gray scale image that looks just like a Layer Mask.
- You can look at it there.
- For this assignment you will name your saved selection for each of the three flowers, simply, flower
- Saved selections are a part of the Photoshop file, they are not separate files.
How to use the Quick Mask tool
- Press Q to enter Quick Mask Mode.
- If you have already made a selection, the area outside of it (the unselected area) will have a reddish overlay.
- The color of the overlay can be changed easily in the event that there is a preponderance of red in the color image thus making it difficult to see the extent of the mask. You can also adjust its opacity.
- See Quick Mask options
- As mentioned before, the overlay is also very good to use for checking an existing selection. You may want to periodically turn Quick Mask Mode on and off (use the Q key) to check the progress of your work on the selection.
- The selected layer in the Layers panel will also have a red tint.
- If you have already made a selection, the area outside of it (the unselected area) will have a reddish overlay.
- Press B to select the Brush tool.
- Tips for working with a brush (this applies to many other tools as well):
- To change the size of the brush, or soften the brush edges, use these keyboard shortcuts:
- To increase or decrease the brush size, hold down the left or right bracket key:
- left ( [ ) reduces the brush size.
- right ( ] ) increases the size.
- You will see the brush size represented by a circle that gets larger or smaller. Note that if the brush is very small or very large you will only see a plus ( + ) symbol. Hold down a bracket key until you see a circle appear.
- To create a softer or harder edge to the brush (for providing blending smoothness), Hold down the Shift key at the same time. You will see the circular shape of the brush change, but this time it represents the middle of the softness that you have set, if any.
- To increase or decrease the brush size, hold down the left or right bracket key:
- To change the size of the brush, or soften the brush edges, use these keyboard shortcuts:
- Press D on your keyboard to set the colors to Photoshop's default colors...
- Black for the foreground color and white for the background.
- Those terms are not very helpful in this context.
- It would be more useful to think of them as:
- black = subtract from selection (making it appear reddish)
- white = add to the selection, to make more of the color image visible.
- Note that as you paint, you will not actually be painting in black and white (b&w), or seeing the b&w colors that your brush is set use. You will actually be painting selected or unselected areas.
- Use your brush to paint or remove from the selection:
- The brush can be slow, be patient.
- Use black to remove from the selection (which adds to the red overlay).
- Use white to add to the selection (removes from the red overlay).
- Press the X key to quickly swap the b&w painting colors as needed.
- You can swap between Quick Mask Mode and the crawling ants of the selection by just pressing Q on the keyboard. I tend to do that a lot.
- Note that in Quick Mask Mode the only colors permitted for the brush are gray scale. If you pick an actual color from the color picker, Photoshop will convert it to its gray scale equivalent.
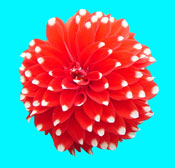
Your assignment
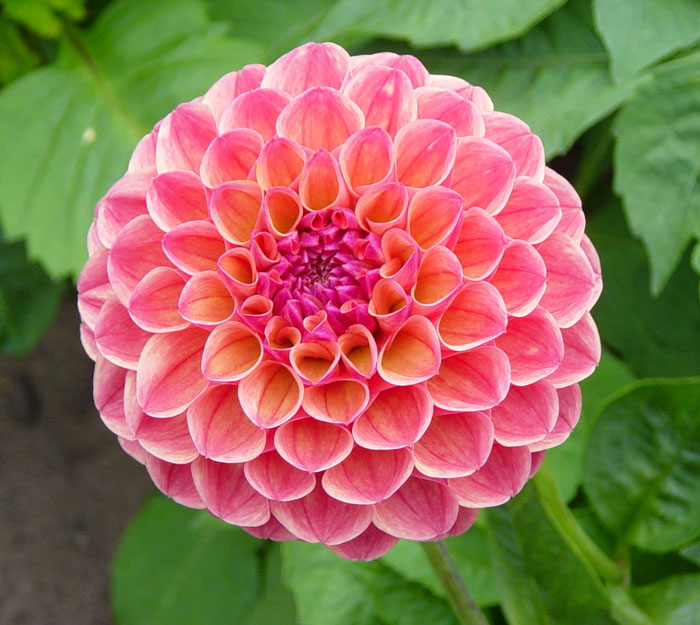 |
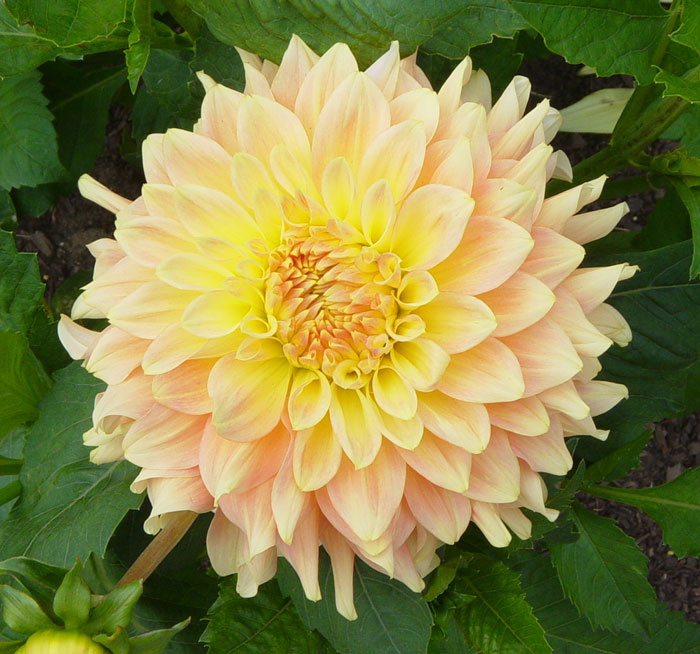 |
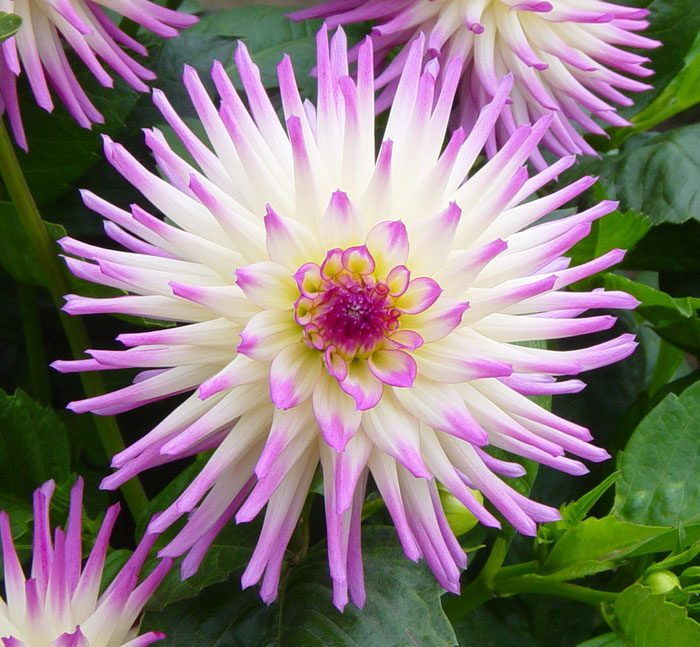 |
| dahlia-A.jpg | dahlia-B.jpg | dahlia-C.jpg |
Your assignment is to create and save a selection for each flower that clearly and precisely delineates the shape of the outer edge of the flower in each image. You will be graded on the accuracy of your selections.
- Download the three images above by right-clicking on them one at a time and selecting Save (or similar, depending on your browser).
- Open all of them in Photoshop.
- Use File > Save As... to save each jpg in the Photoshop format.
- This will allow you to manipulate the image.
- At the bottom of the Save As dialog box is a Format menu.
- Select Photoshop from the top of that menu.
- Use the jpg file's initial root name prepended by YOUR first name and a dash ( – ), no spaces!
- For example, I would name my files:
dan-dahlia-A.psd
dan-dahlia-B.psd
dan-dahlia-C.psd - Use YOUR first name (doh!).
- For example, I would name my files:
- In the Layers panel of each file, there will be only one layer, named: Background. It contains the flower image.
- Click on that layer to select it.
- Press Ctrl/⌘-J on your keyboard to duplicate that layer.
- I do this in order to keep the original image layer intact in the event that I need to revert to it.
- Now click on the eye icon on the left side of the Background layer to hide it and so as to avoid accidentally editing it.
- Double click on the name of the new layer, Layer 1, and change it to flower.
- Save each file periodically as you proceed.
- Now select the flower using the information in the section How to select pixels, above. I suggest you read it again before you proceed! I would start with Select > Subject
- As you develop your selection, press the Q key to toggle Quick Mask Mode. This will assist you in checking the accuracy of your selection.
- Regarding the dahlia-C image, please try isolate the central large dahlia and remove the additional purple flowers on the periphery.
- When you think your selection is correct, go to Layer > Layer Mask > Reveal Selection
- This creates a layer mask which will make transparent anything that was not selected.
- The transparent area is represented by a white and gray checkerboard, which is the standard representation in many graphics programs.
- A b&w thumbnail image of the layer mask will be displayed in the layer to the right of the color thumbnail.
- The white area represents pixel locations that have a multiplier values of 1.
- The black area represents multiplier values of 0 (zero).
- As mentioned previously, these values are then multiplied by the RGB values of each color pixel to determine the resulting image.
- Do the following as additional checks of the accuracy of your selection's mask:
- Alt/Option-click on the layer mask to load the mask image.
- Look for stray gray areas that ought to be black or white.
- You can paint them out with the brush tool (use the "X" shortcut key to switch between black & white colors)
- Also, add a solid color layer beneath the flower layer that has the transparency you added.
- Select the original Background layer at the bottom of your Layers panel.
- Then add a layer with a solid color, which will go above it:
- Layers > New Fill Layer > Solid Color >
- The Color option in the next step refers to applying a tint to that layer in the Layers panel, not the color of the new fill layer. Just click OK to proceed.
- Next, the Color Picker will appear so that you can select a suitable bg color.
- I assume you are already familiar with the use of the Color Picker.
- Specify a color that will be best for distinguishing the boundary of the edge of the flower. You will probably want to use a different color for each flower.
- For example, if you have a predominantly red flower, select its opposite, light blue.
- It is easy to change the color of the color layer. Double click on the color thumbnail at the left of the layer. This will open the Color Picker allowing you to change the color.
- TIP!
With the Color Picker open, move the little selection circle around in the color selection area and in the vertical spectrum bar. The background color will change simultaneously. This allows you to preview the accuracy of your mask with a variety of colors, tints, and shades. Terrific!
- TIP!
- Note that having this layer with a suitable contrasting color will be a part of your grade. Please leave it visible (have the color layer eye icon enabled).
- Alt/Option-click on the layer mask to load the mask image.
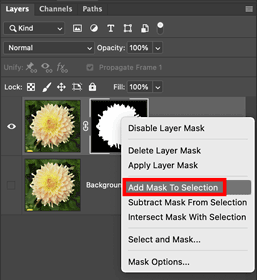 If you want to modify the layer mask, you need to load the selection from it back onto the image by right clicking on the layer mask icon and selecting Add mask to selection (this works even if there is no current selection). Or load it from the saved selections using Select > Load Selection
- You ought to see the shape of your mask displayed as a selected area with the characteristic crawling ants.
- Use the knowledge you have gained to improve on the selection.
- If you intend to replace the layer mask with your revised selection (you probably will), first remove the existing layer mask by right clicking on its thumbnail icon and selecting Delete Layer Mask.
- Then make a new layer mask from your improved selection by using the Add layer mask button at the bottom of the Layers panel.
- When you have a selection that you like, save it using the Select menu > Save Selection > Name > flower
- If you don't have a proper saved selection shown at the bottom of the Channels panel it will affect your grade.
- Save your Photoshop psd files: File > Save
- Put all three of the flower files into one folder (if they aren't already in one, with no other files in it).
- Name that folder
yourfirstname-flower-selections - ...and replace yourfirstname with YOUR first name (doh!).
- For example, I would name my folder:
dan-flower-selections
- Name that folder
- Zip that folder and upload it to the Canvas assignment.