Optimizing Images Using Photoshop
Optimizing an image means making the image file size as small as possible while maintaining acceptable image quality.
Introduction
Other files are often called for in the HTML file's code
In order to understand why optimizing an image is important, please take the following into consideration:
- Whenever you click on a link, a request is sent to a Web Server for an html file to be sent back to you.
- The code in that html file will usually specify other files that are also needed for the page to look correct and behave properly.
- These other files usually include css, JavaScript, and image files.
- The HTML file and those other files usually need to be sent to your device and downloaded there.
- The amount of time that it takes for all the files to reach your device and be rendered by your web browser will determine when and how properly the web page will be displayed.
Delay = lost visitors, lost business
- The amount of time that it takes for a web page to be rendered properly depends on server speed, bandwidth between your computer and the web server, and, to a very large extent, how large those other files are.
- Studies have shown that visitors to web pages have limited patience for the time it takes for a page to load.
- An optimal load time in 2016 is about 2-3 seconds.
- Just five seconds is the average threshold time beyond which visitors will abandon their attempt to view a web page.
- That means that half the people leave in less than five seconds.
Reducing file sizes
- Image files are usually the largest files that need to be downloaded and therefore are often the culprit responsible for slow webpage load times.
- As a result, a lot of effort is made to minimize the size of those files.
- Therefore, it is in your interest as a web developer to reduce the time it takes for the page to load especially by reducing the file sizes of your image files.
- For code files, minification is used to remove unnecessary blank spaces. Blank spaces require code to be saved with the file even though you cannot see the spaces!
- More on code minification:
- For images, image file size optimization is used.
- Image optimization means file compression.
- In most cases the process of image optimization means that the integrity of the resulting image is compromised.
- The question posed to the developer is how much of a reduction in quality is acceptable.
- Note that larger, higher resolution images almost always have larger file sizes than smaller, lower resolution images.
Limited file format options
There are a limited amount of image file formats that web browsers can display. They are:
| web file formats | best for | meaning of the file extension |
|---|---|---|
| .webp | photographs and some graphics | Photoshop can "export" in this format only when using the Save As command in the File menu. It offers no controls for adjustments although it does provide adjustments for gif, png, & jpg exports. NOTE: Related to the .webm multi-media file type. Interestingly, the letter "m" represents the Matroska container file. In turn, that word refers to the famous Russian Matryoshka doll which has one doll inside another, inside another, and so forth. This represents the many media types the container can have. |
| .jpg or .jpeg | photographs | Joint Photographers Experts Group |
| .png | images that consist of solid colors |
Portable Network Graphics |
| .gif | small, brief animations | Graphics Interchange Format |
| .svg | images that can be described mathematically using vector graphic shapes | Scalable Vector Graphics |
What is acceptable image quality?
When image file sizes are reduced the resulting file quality is usually reduced. The specifics of what constitutes an acceptable image is subjective. Some of the factors that are taken into consideration are:
- If the image is of a featured product or person, the image quality ought to be commensurate with that relative value or importance of what is depicted.
- For this reason, larger, higher resolution images with more detail are often loaded only as needed; smaller images are provided in the interim.
- If there are only one of two images on a page, then increased quality might be afforded those images without overly impacting download time.
- If there are many images to be shown on one page, then some additional reduction in quality may be acceptable.
To judge image quality take these factors into consideration:
- hair detail
- edges of objects
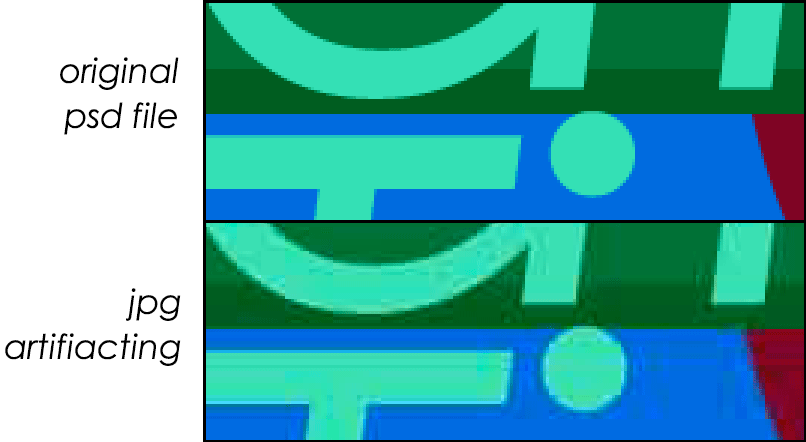
- jpg compression generates artifacting (distortion) along hight contrast edges.
- The distortion looks like dirty color. See the image below.
- bands of colors - an artifact of png-8 and gif when used with subtle shifts of tone, such as a gradient.
Image CDNs are often used to generate images.
- These are used to apply a variety of different characteristics to an image including optimization and size.
- Images are widely distributed on CDNs that contain an image application which can then rapidly distribute images of the appropriate size and filetype.
- This is the most effective way to distribute images for many sites and is especially useful for accommodating various screen sizes.
Typical format choices
For photographs, the best choice is usually jpg compression because I provides "millions of colors" and compresses file size more effectively than if png-8 or gif were used for a photograph.
For images that consist of solid colors with little variation in color (logos, solid color shapes and letters, cartoons) the best choice is usually png using the png-8 compression option which provides 8 bits of color, 256 possible colors. The png-24 or 32 formats result in very large files. The only situation when it is typically useful to use png-32 is when needing a soft edge blend of transparent areas of the png image with the background. The svg format can be very effective as well.
The gif format is best used for small size, brief animations. The other formats do not provide for animation. It is also allows only 8 bits of color information, 256 possible colors.
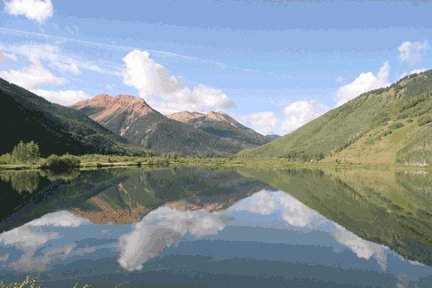
Here is an example of an image saved as a png-8 with limited colors and no dithering. Note the banding of color in the sky and reflection of the sky. This type of image, a photograph with very gradual changes of color, is almost always best compressed in the jpg format.
Here is an example of when not to use jpg compression. This type of image will look best when optimized as a png-8 file.
Note that the term search engine optimization (SEO) is also frequently used with respect to the web. In that context, optimization means using tools and strategies that will increase the likelihood of a webpage appearing near the top of a search results page. There are also other forms of "optimization". Do not confuse image optimization with the others.
Before you do the exercise below read these articles to learn all about image optimization:
- Optimizing Images for Web: A Practical Guide
- Optimizing images for the GIF or PNG-8 format - end your reading when you reach the section Create an animated gif.
Additional references:
- The Comprehensive Guide to Saving Images for the Web
- Speed Up Your Website with Better Image Optimization in Photoshop
End user download speed
- The download bps (bits per second) speed used by Photoshop for calculating the time it will take for an image to download is in the lower left corner of the preview window.
- The download time shown is based on the settings in the right sidebar.
- The download speed used for the calculation can be changed by clicking on the menu to the right of the currently set download speed.
- The default bps speed is 56kbps which as an antiquated speed. However, your assignment is based on relative download speeds. Therefore it is immaterial what the speed is set to. Your goal is to find the settings that provide for the optimal download speed and image quality regardless of actual download time.
- Actual download times will vary based on users' actual download speed, which can vary widely.
- It is best to provide for the lower end of the download speeds that you anticipate your viewers will be using.
Never edit original images!
- There is nothing worse than having to go back to your client and ask for an image file that they provided to you but that you have lost or messed up, or an original image that you have no replacement for.
- By creating a Photoshop file from the original image file, you are not touching the original image, which is something you should not do.
- Original images should never be edited but set aside in case they are needed again.
- The prudent procedure is to always make a copy of the original file using "File > Save as" and selecting the Photoshop format. You can then edit the Photoshop file without being too concerned about mistakes.
- Save the copied file in the Photoshop format if it is not already in that format.
Instructions
- Download the 7 day trial version of Photoshop.
- NOTE that Adobe has an alternate way ("Risk Free") to get the trial version but it requires a credit card and automatically subscribes you to a one year subscription after the seven days. I assume it can be opted out of, but I'm not sure how or when. The link provided above does not require a credit card as of March 11, 2020.
- Also note that the process of opening a new Adobe account, then downloading the Creative Cloud and Photoshop apps, and then installing Photoshop took me a total of about 30 minutes.
- Save this zip file, then right click on it and select Extract in Windows Explorer or just double click on it in Mac Finder.
- Change the names of both files so that they are prepended by your lastname-firstname-
- For example, I would save the files this way:
- vaughan-daniel-opitimize-graphic.psd
- vaughan-daniel-reflection-p4lrn.jpg
- Open the two files in Photoshop.
- Save the lake reflection image as a Photoshop file: File > Save As > ...then, in the Format menu at the bottom, select Photoshop and keep the root file name.
- For example I would name mine:
- vaughan-daniel-reflection-p4lrn.psd
- For each image, one at a time, use File > Export > Save for Web (Legacy)...
- This will open the Save for Web dialog box.
- Based on what you have read, optimize each image.
- Optimize your files to be either jpg or png-8.
- Do not use png-24 or gif or any other format.
- For png files, do not use transparency.
- As you make your settings, note why you made each setting.
- The settings that I will consider in my grading consist of the following:
- Why did you decide to use jpg or png-8 for the image?
- For .jpg files:
- What Quality setting did you make and why?
- For .png files:
- How many colors did you decide to use and why?
- Did you use dithering or not, and why?
- If you used dithering, what setting did you use and why?
- For the reflection file, use the Save for Web dialog box to set the image size to 50% in the lower right corner.
- FYI, this is a deceptive percentage setting because it refers to the width and height, not the overall area. With a 50% setting the resultant area is actually 25% of the original.
- Check the file sizes of your optimized files you created using Windows Explorer or Mac Finder.
- The term "file size" refers to the size of the file in KB, not its dimensions.
- Your optimized files need to be much smaller than the original files that they are derived from.
- The reflection ought to be a lot smaller in file size than the original because the image area is 25% of the original.
- Write an explanation of the optimization settings that you made for each of the list of questions I listed above.
- Put your explanations into a file using a file format such as .docx, .,pdf, .txt or .rtf - please do not submit a .pages file.
- Specify for every optimization setting that you made why you made that setting.
- Name that file yourlastname-firstname-explanation
- For example, if I were to save my file as a Word file it would be named:
vaughan-daniel-explanation.docx
- For example, if I were to save my file as a Word file it would be named:
- Create a folder named:
yourlastname-yourfirstname-optimize - Put the following files into the folder:
- Both optimized files.
- Your written explanation.
- Please do NOT send the .psd Photoshop files.
- Compress the folder as a zip or rar file and name that file yourlastname-yourfirstname-optimize.zip (or .rar if that's the compression you use).
- For example, I would name mine:
- vaughan-daniel-optimize.zip
- To zip a file in Windows right click on the folder > Send to > Compressed file
- On a Mac right click on it and select Compress.
- For example, I would name mine:
- Submit the file to me.