HTML and CSS Basics - 01
- You must have heard of HTML - Hypertext Markup Language, but may not know what it means or how it works.
- Regardless of what your background is, having a fundamental understanding of both HTML and CSS (Cascading Style Sheets) provides you with a tremendous advantage when using Dreamweaver. That's why I want you to learn/review some of it.
- HTML is not really a programming language because HTML pages can't do anything other than provide a browser with tagged information in a plain text file. Then the browser decides how to display the HTML code based on how it's marked up and also using any CSS styles associated with it. Most browsers will display HTML about the same way. But the HTML that is shown is static - it will not cause things to move on your screen, at least not by itself.
- Note that CSS is capable of creating animations, but that is a somewhat advanced topic.
- The term markup refers to using tags, and there are usually a starting and end tag, intended to provide some kind of identification of what type of information is between the opening and closing tag.
- Tags look like this <h2></h2>.
- The tags and everything between them are referred to as an element.
- Here is the coding of an h2 element. Note that it includes an <em> element within it which is a nested element. An <em> element results in the text inside of it appearing italicized (unless otherwise specified by CSS):
<h2>This is a <em>header</em> of secondary importance</h2>
- Here is what the above code looks like in a browser:
This is a header of secondary importance
- CSS (Cascading Style Sheets) specifies the appearance of the elements and the structure of the page layout (the overall composition of the page sections).
- CSS works with HTML to identify where the styles get applied.
- The following uses the same code as shown above but also uses CSS to control its appearance:
This is a header of secondary importance
Your assignment
I think you will enjoy seeing how coding works. For those of you who already know html and css, please do this exercise anyway, a little refresher will probably be good for you and it will demonstrate to me what you are actually capable of. Knowing how html and css work will help immeasurably when using Dreamweaver.
- Go to this page: Code Academy tutorial
- Complete the following tutorials. I have included several notes for them below that you may find useful.
- Note that there are some situations where the tutorial insists that you have coded something incorrectly. Sometimes you have made a mistake and need to find it based on what they report as the error. They make this very simple.
- But at other times the error message is not accurate. I have made note below of the few steps where this happened to me. If it happens to you, just go to the next page using the menu at the top of the left sidebar.
- You must use a plain text editor for your code. Do not use a word processor such as Microsoft Word or Apple Pages. Examples of plain text editors include:
- Windows Notepad
- Mac TextEdit but TextEdit must have these settings.
My notes about the pages, please read them
INTRODUCTION TO HTML section
- HTML Basics — sub-section
- Adding images to your site! — sub-sub-section
- 9. Mid-lesson breather
- This "breather" is basically just a review of what's been covered. There are several such "breather" reviews in these tutorials.
- 10. You're going places!
- Have your link go to <a href="http://www.w3.org">W3C</a> if you can't think of a URL. That site is the organization that sets the rules for most of the code used for web pages. This includes setting the rules for HTML, CSS, JavaScript.
- Note that http:// is needed for coding links.
- Have your link go to <a href="http://www.w3.org">W3C</a> if you can't think of a URL. That site is the organization that sets the rules for most of the code used for web pages. This includes setting the rules for HTML, CSS, JavaScript.
- Note to always put quotes around attribute values.
- Here's the syntax to follow, using a hypothetical names:
<tag attribute="value"> some text </tag> - In truth, you don't need to have quotes if your attribute values have no spaces, but it is a best practice to include quotes for all attribute values.
- Here's the syntax to follow, using a hypothetical names:
- 11. Adding images
- Coding note: Putting a slash at the end of an img tag (before the closing angle bracket) is not part of the HTML5 specification. HTML5 is the current version of html. However, all browsers accept it. Slashes at the end of such "empty" elements (elements that have no closing tag) is a vestige of the prior version of html: XHTML. It is still coded by some for empty elements - I don't know why.
- 13. Images and links
- Development note: Do not display images on a web page that you do not have the rights to use.
- With that in mind, for this lesson, I suggest you get your image URLs by right-clicking on the small images on this page which offers images that are generally, but not always, free to use:https://commons.wikimedia.org/wiki/Commons:Quality_images
- Note that before you use any of these images elsewhere outside of this course you must ascertain their licensing terms. You will find them, or links to them, on the pages for the individual images. Usually the rules are very liberal for non-profit sites.
- 9. Mid-lesson breather
- Adding images to your site! — sub-sub-section
- Build Your Own Webpage — sub-section
- Build Your Own Webpage — sub-sub-section
- 2. Every house needs a frame
- Skip this page!
- Use the menu at the top of the left sidebar to go directly to page 3/6.
- The problem? No matter how many times I inserted the correct code I kept getting an error message that the <!DOCTYPE> tag was wrong.
- 2. Every house needs a frame
- Build Your Own Webpage — sub-sub-section
HTML STRUCTURE: USING LISTS section
- HTML Basics II — sub-section
- Making lists — sub-sub-section
- 6. Lists inside a list
- It is important to note that when there is a sub-list, the closing list item tag </li> of the item preceding the start of the sub-list comes AFTER the closing tag of the sub-list. Here's an example of :
<ul>
<li>This is the first bulleted list item. Its closing tag is after the sub-list because the sub-list is considered a part of the upper level list item:
<ol>
<li>item one</li>
<li>item two</li>
</ol>
</li> ← this is the closing tag of the first bulleted list item>
</ul> - A word about the use of "inline styles"
- This tutorial makes much use of "inline styles", that is, using the html style attribute to apply css.
- This is not a good practice, as you will learn later.
- It is much better to code styles into a separate .css file that is then linked to by the html file. You will be using that later in the tutorials.
- However, the way to write a CSS property:value; pair is the same in external .css files and also when the css is "embedded" in the head of the html file (this is done using <style> tags).
- It is important to note that when there is a sub-list, the closing list item tag </li> of the item preceding the start of the sub-list comes AFTER the closing tag of the sub-list. Here's an example of :
- 6. Lists inside a list
- Styling the font! — sub-sub-section
- 10. Font family
- This page shows examples of font-family in the introduction, but the assignment also wants you to change the font-size as well, both set within one tag.
- To set the font size use this attribute: style="font-size:16px;"
- To include both the font-size and the font-family, end each property:value; with a semi-colon ( ; ) as follows:
style="font-family:arial; font-size:16px;"
- This page shows examples of font-family in the introduction, but the assignment also wants you to change the font-size as well, both set within one tag.
- 10. Font family
- More nice styling! — sub-sub-section
- 15. Emphasize words!
- Note that they don't want the exclamation point ( ! ) inside the <em> element.
- 15. Emphasize words!
- Social Networking Profile — sub-section
- No comments for this sub-section.
HTML Structure: Tables, Divs, Spans
- HTML Basics III — sub-section
- Better tables — sub-sub-section
- 7. Table Heads
- The exercise instructions state "Then we have an opening <tr> tag for the row. [to start the row]" - but there is no <tr> element there, so you need to create it.
- 7. Table Heads
- Div and span — sub-sub-section
- 11. 'Div'ide and conquer
- I got an error message stating that I needed to set a height, but it was set. I suggest you just go to the next part 12/15 using the menu in the upper left, at the top of the sidebar, should you encounter this problem.
- 11. 'Div'ide and conquer
- Better tables — sub-sub-section
- Click-able Photo Page: Do not do this part
INTRODUCTION TO CSS section
- CSS: An Overview — sub-section
- No comments for this sub-section.
- Design a Button for Your Website ;— sub-section
- Coding in Style — sub-sub-section
- 2. Drawing your button
- You need to add border-style, border-width, and border-color, in order to see the border.
- Those properties can be written using the border "shorthand" property as follows:
- syntax: selector {border: style width(includes unit of measurement) color;}
- example:
div {
border: solid 2px red;
}
- 2. Drawing your button
- Coding in Style — sub-sub-section
Now, please do the following:
To do this exercise, you can use any one of the online tutorial's html code editing pages. That editor will allow you to see the results of your code in the preview pane. Otherwise, you can use Notepad on Windows or TextEdit on Mac (with these settings).
- Start by saving an html file, even if there is no code in it yet. Save your file as:
- yourlastname-html-css-basics-01.html
- Be certain to include the file extension .html at the end. Do not use .txt or any other filetype extension.
- Replace yourlastname with your last name.
- For example, if I were saving the file I would name my file: html-css-basics-01-vaughan.html
- Create the html code needed for a proper basic html page including doctype, html, head, title, and body elements in the proper sequence.
- Include an html <title> with the following information:
- yourlastname html-css-basics-01
- Once again, please replace yourlastname with your last name.
- For example, if I were doing this exercise, I would write this code:
<title>vaughan html-css-basics-01</title>
- For example, if I were doing this exercise, I would write this code:
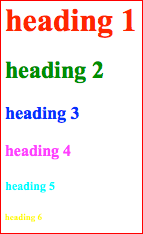
- Then code within the body an example of each of the 6 headers using the words "heading 1", "heading 2", and so on. It ought to result in looking like this:

- Then use the html style attribute to format the text of each of the headers the following colors:
- red - for heading 1
- green - for heading 2
- blue - for heading 3
- magenta - for heading 4
- cyan - for heading 5
- yellow - for heading 6 (you will have a difficult time seeing the yellow text)
- Your headings now ought to look like this:
- Underneath the headings create a paragraph element.
- Put into the paragraph element: Copyright followed by the entity for a copyright: © ...followed by the year and your full name. For example, in the code I write I would have:
- Copyright © 2016 Dan Vaughan
- Then end the page with closing </body> and </html> tags.
- Upload the file to me.