Site-Root Relative and Document Relative Paths Exercise
- By following the instructions below you will be mimicking the illustration above.
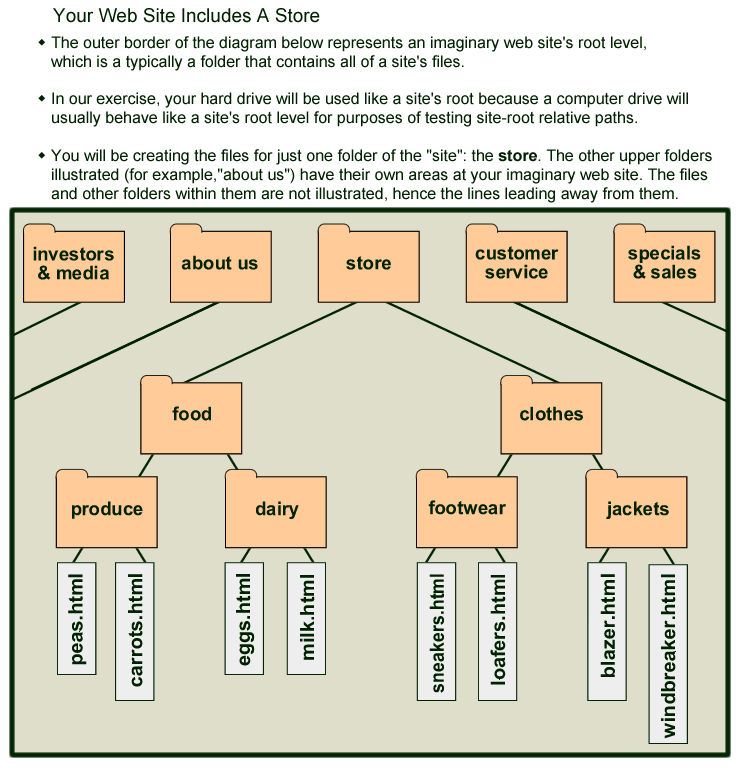
- Each tan colored object represents a folder (also called a directory).
- Each white rectangle represents an html file.
- The large rectangular border represents the site's root, the folder that contains your entire site. Your hard drive will be used as the root.
- You will be creating folders and html files on your hard drive's top level.
- The drive's top level will behave like a site's root level, it will allow site-root relative paths to work.
- This way, you can test site-root paths without needing to use an actual web server.
- About the disk drive used for your pseudo site-root:
- Windows users:
- Right click on the Windows Start button (lower left corner) and select Explore.
- Windows Explorer will open (note that's not Internet Explorer).
- Select Local Disk (C:) drive on the left side - you will find it in My Computer.
- You don't need to use the C: drive for this exercise, but whatever drive you use, be sure to put the exercise files and folders in the top level of it. This exercise ought to work for any disk drive you select on a Windows PC (but not a DVD/CD drive or the like).
- You will need to substitute the letter "C" in the paths below with the letter of the drive that you are using if it is not the C drive.
- Do not use My Documents.
- Mac users (based on OS 10.9.2):
- In the Finder select the Macintosh HD drive, or whatever you may have renamed it.
- It will be in your Finder on the left side under Devices.
- Do not use anything under Favorites or Shared (or Places in older OS's).
- On either platform, click on the name of the drive and you will see the contents of the top level of the drive.
- Create a folder named store within that top level.
- Then make folders and sub-folders as illustrated at the top of this page.
- Then make html files as shown following these rules:
- Each html file must have basic html page structure tags including title tags.
- Their file name needs to be the name of the file shown in the illustration.
- The files each need to go into their designated folder.
- The html title needs to be the same as the name of the file shown but without the .html file extension.
- Example: <title>Peas</title>
- On each page put a <h1> heading that is also the name of the file, also without the .html file extension.
- The word used as the link needs to be the same the title.
- Each html file must have links to all the other html files in the site following these rules:
- Make each link a list item in an unordered list.
- Do not use the _target attribute.
- For all of the files in the food folder, create site-root relative paths to all other files.
Your link paths need to start with...
- On Windows, if you are using Internet Explorer 7 or 8 or on a Mac using either Firefox or Safari, start paths with a simple forward slash (which is the proper method for specifying the root in a file path):
/
- If you are using Firefox on Windows your paths need to start with (the standard single forward slash did not work):
file://C:/
- Example: a site-root relative path to the eggs.html file from any of the pages, the link would be:
- If you are using Firefox on Windows:
<a href=file://C:/store/food/dairy/eggs.html>eggs</a>
- If you are using Windows with Internet Explorer 7 or 8, or, on a Mac using Firefox or Safari the link would be (and this is proper syntax for a site-root path):
<a href=/store/food/dairy/eggs.html>eggs</a>
- Note that
file://C:/ will work in all the browsers I've mentioned, even on the Mac. However, I'd rather the single slash be used as it is the proper way to indicate a site's root. Of the browsers I tested, only FF on XP would not work with the single slash.
- I did not test Chrome (or the less-used browsers such as Opera, Epiphany, Konqueror (yes, the K is korrect), etc. For Windows, I only tested with Windows XP.
- If you are interested, here are the results of the testing that I did, trying various combinations of browsers and operating systems. The links will not work for you! They will only work in a specific testing environment. The results also provide an example of the variations that can exist between browsers.
- For the files in the clothes folder, create document relative paths.
- For example, for the sneakers.html file's link to the loafers.html file, this is all that is needed:
<a href=loafers.html>Loafers</a>
- For the sneakers.html file link to blazer.html, this is what is needed:
<a href=../jackets/blazer.html>blazer</a>
- For a link in sneakers.html to eggs.html:
<a href=../../food/dairy/eggs.html>eggs</a>
- An explanation of this path for your edification:
- As mentioned previously,
../../ in the link indicates going up two folder levels:
- The first
../ goes up to the clothes folder where the folders for footwear and jackets are.
- The second
../ goes up one more folder level to the store folder where the folders for clothes and food are.
- Then the path indicates going down through the food and dairy folders to finally arrive at the eggs.html file that is being linked to.
-
Reminder: the web uses UNIX syntax for it's paths, which uses:
- Forward slashes ( / ) to separate folder levels.
- A slash at the beginning of a path represents the site's root.
- Two dots and a forward slash ( ../ ) represent going up one folder level.
- FYI:
- Windows displays paths using backslashes ( \ ) and the Mac OS sometimes uses colons ( : ) to indicate folder levels.
- Also note that Macs are actually running on UNIX, but that is somewhat hidden from users.
- Again, make each link a list item in an unordered list, and do this on every page.
- Test all the links on all the pages before sending it to me.
- Check that each file's title, page heading, and file name correspond to one another, as per instructions.
- Zip up the entire folder and name the zip file:
- Yourlastname_C02.zip (the file name does not have to end with .zip ...the file extension can vary depending on the compression method you use).
- In the message area, please include:
- The browser and version you worked with. To get the version number:
- Windows: In the Help menu, select About...
- Mac: In the browser's menu (the menu to the right of the apple menu) select About...
- The operating system you used (For example, Vista, Windows7, XP, OSX)
