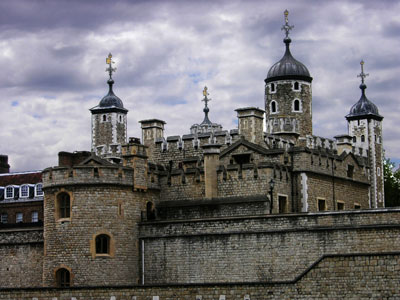
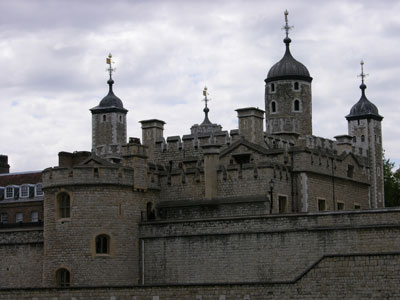
Photoshop Selections 01 - Tower of London
Selecting is the term used by many computer graphics programs to refer to the process of identifying certain pixels (usually a group of them) that may require different image manipulation than the other pixels in the image. Selected pixels can be cut, moved, brightened, blurred, or any of a myriad of potential modifications to the image.
Once a selection has been made, the selected pixels can be stored as a bitmap image that uses eight bits per pixel, which allows for 256 possible values ranging from 0-255. Those values are then translated into values ranging from from 0 - 1 which can then be multiplied, pixel-by-pixel, against any image's pixels in order to control which pixels can be affected. A value of 0.5 will allow half the color pixel's value. The other half of the value will be transparent. Zero (0) will not allow any of a color pixel to be seen (the product of zero times any number results in zero).
Those values of 0 to 1 can be represented by a black and white image where 0 = black and 1 = white. Such images are often referred to as masks. The pixels can be black, white, or any shade of gray in between.
Selecting pixels in an image using Photoshop can be done using many different methods including by using the image's:
- color
- contrast
- brightness
- or by manually drawing/painting
- ...and many more
In this exercise you will create selections, save them, use them to control color, then submit the photoshop file that you used and an optimized jpg file following the instructions below.
- Right-click on * this link * and select Save Link As...
- Open the file in Photoshop.
- Then... File > Save As...
- Before you save the file, use the Save As dialog box to create a new folder where you will save this file and also, later, the exported jpg file that you will create.
- Name the new folder selections-01-yourlastname-yourfirstname
- Replace yourlastname with YOUR last name and yourfirstname with YOUR first name.
- For example, I would name my folder:
- selections-01-vaughan-daniel
- Name the new folder selections-01-yourlastname-yourfirstname
- In the Save As dialog box now select > Format > Photoshop
- In the Save As field enter (you will see that this is the same name as the folder name, but with the .psd file extension at the end of it):
- selections-01-yourlastname-yourfirstname.psd
- Replace yourlastname with YOUR last name and yourfirstname with YOUR first name.
- For example, I would name my file:
- selections--01-vaughan-daniel.psd
- selections-01-yourlastname-yourfirstname.psd
- Be sure that you will be saving the file inside the new folder you just created and then click > Save
- In the Layers panel right click on the one layer "Background" and select Duplicate Layer from the menu.
- The Duplicate Layer dialog box opens.
- In the As field enter > sky
- A new layer named sky will appear.
- Follow steps 8-9 again, but now save the layer As > buildings
- A new layer named buildings will appear beneath the sky layer in the Layers panel.
- Click on the sky layer to select that layer.
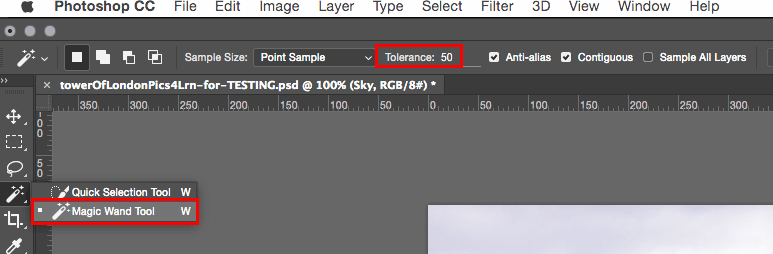
- Select the Magic Wand tool in the tool
- bar and set the Tolerance to 50 as per this illustration:
- Click in the middle of the sky area of the image once. This will create an initial selection which will be bordered by crawling ants (rapidly moving black and white dashes).
- Then hold the Shift key down and click one or more times in the areas of the sky that were not initially selected in order to select the entire sky. The crawling ants ought to surround the edges of the sky.
- If you have selected areas outside the sky, then press Ctrl-D to remove the selection. Then go back to the prior step to start the selection process again.
- Select menu > Save Selection > Name > sky > OK
- Make sure that the sky layer is selected.
- Layer > Layer Mask > Reveal Selection
- This creates a layer mask that will limit any effects applied to that layer to just that area - the sky.
- A thumbnail image of the mask will be shown in the layer to the right of the color thumbnail image.
- The mask is represented there in black and white.
- The white area is what will be affected when anything is applied to that layer.
- Select the buildings layer.
- Select > Load Selection > Channel > sky > and now check Invert > OK
- This will create a selection that is the reverse of the sky area, that is, the parts of the image that were not originally selected.
- Once again: Layer > Layer Mask > Reveal Selection
- This creates a layer mask that will limit any effects applied to just that area - this time it will be the buildings.
- Make sure that the buildings layer is selected.
- Layer > New Adjustment Layer > Brightness/Contrast > accept the default settings > OK
- The Brightness/Contrast Properties panel ought to open.
- If it does not open: Window > Properties
- Click on the little icon at the bottom of the panel that looks like a white square with a downward-pointing arrow to its left. This will limit the affect of the adjustment layer to only the layer directly beneath it:
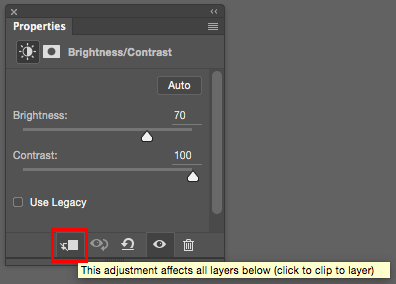
- Enter these values:
- Brightness >70
- Contrast > 100
- Select the sky layer.
- Layer > New Adjustment Layer > Brightness/Contrast > accept the default settings > OK
- The Brightness/Contrast Properties panel ought to open.
- If it does not open: Window > Properties
- Once again, click on the little icon at the bottom of the panel as mentioned and illustrated above.
- Enter these values:
- Brightness > -75
- Contrast > 100
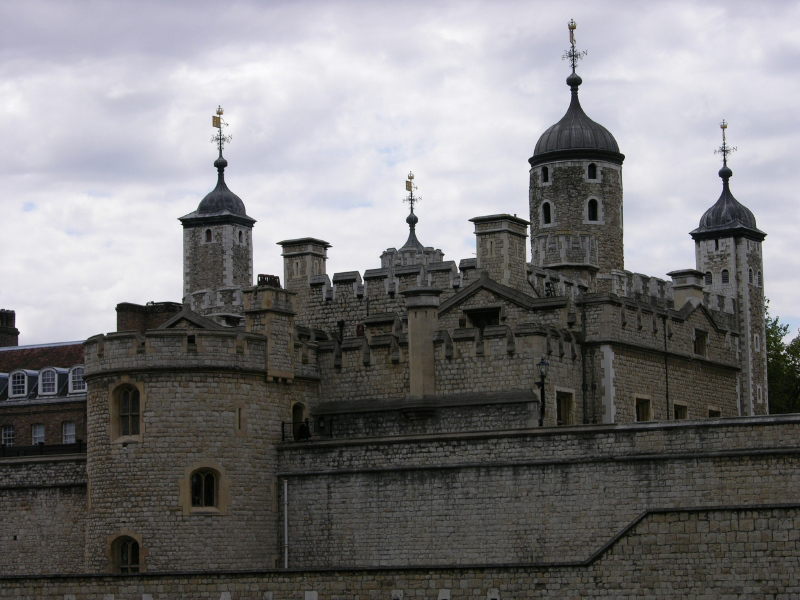
- The image ought to appear very ominous and forbidding now.
- Save your Photoshop psd file: File > Save
- Now export your file as a new jpg file for use on the Web, as follows...
- File > Export > Save for Web (Legacy)
- In the Save for Web dialog box that opens, make these settings:
- Preset > JPEG High
- Image Size > Percent > 50 > Enter
- Your exported/optimized file needs to be saved in the same folder that you have your .psd file in.
- Name the file (be sure to include –50pct):
- selections-01-yourlastname-yourfirstname-50pct.jpg
- Replace yourlastname with YOUR last name and yourfirstname with YOUR first name.
- For example, I would name my file:
- Name the file (be sure to include –50pct):
- selections-01-vaughan-daniel-50pct.jpg
- Your folder ought to now include:
- your psd file.
- your jpg file.
- Zip your folder (but not the files in the folder):
- name the zip file as follows:
- selections-01-yourlastname-yourfirstname.zip
- Replace yourlastname with YOUR last name and yourfirstname with YOUR first name.
- For example, I would name my zip file:
- selections-vaughan-daniel.zip
- Submit your zip file.
Original
My result - ominous!